A simple note on how to repair bootstructures.

Date : 16 Februari, 2020
Version: 1.3.
By: Albert van der Sel
Status: Ready.
Remarks:

-It's a simple note on how you might repair primary bootstructures on Windows,
and some pointers on how to salvage data.
-I will maintain this note, so sections will be updated and/or new information
added as needed.
-Please refresh the page to see any updates.


I certainly do not think that this is a "Great document" or something. But in some circumstances,
it might help someone (private user), using a PC or Laptop. Who knows?
Indeed, I think that this text might help "personal" users, using private PC's, laptops etc..

I classify this note as personal "defense", since we need to be able to counteract malware,
or other forms of corruption. There is quite some awfull stuff out there...

Ofcourse, it will remain an extremely simple document (since it's a note by "Albert").
Sorry for that.

Here, I like to review some repair functions on Windows Operating Systems, especiallly related
to bootfunctionality. But also some other, hopefully useful, aspects will be discussed.

The text is a bit geared on recovery of "data", meaning your documents (e.g. excels heets, documents,
photo's, your administration etc..., so your "true data" in general).
I think you agree that "the data matters most!".

For a special class of malware, that is "ransomware", repair is pretty difficult. Thousends of very skilled
professionals are analysing instances of that nasty stuff and try to come up with effective countermeasures.

Note: This text is certainly not geared towards "ransomware". It's just a general text to salvage data, and
repair the OS, and discussing some supportive theory.

Often, this sort of malware "encrypts" your datafiles, to make them in-accesible without a key, for which
you must pay substantial amounts of money. And there is no guarantee that you will actually receive
such key. Many officials argue that you should never pay.

It's very clear, that good "Malicious Email Attachment" Detection routines must be developed,
or make them very efficient, since email attachments are an important attack vector for ransomware.

Some very trivial "pro-active" measures exists too, like (later more on this):

  1. Make frequent backups of datafiles and store the backupmedia offline, and keep e.g. "weekcopies" apart.
    So, also keep some older (but still rather recent) backups. Any SysAdmin will tell you that backup/recovery tasks
    are the most prominent duties of System Administration.
    After backups are done, keep the backup devices offline (not connected, or on network).
  2. Do not open unexpected mail attachments. This is most important.
  3. Do not use unexpected/unknown "weblinks", send to you, e.g. by mail.
  4. Use good AV software. There are many brands, but I like MalwareBytes a lot (which says nothing ofcourse).
    AV software that does only a scan once in a while, is not good enough. It must be real-time, intervention software
    that will immediately act if something "smells bad". It will cost some money, but it's neccessary,
  5. Apply Security Patches (and other upgrades) for your OS regularly.
  6. Apply Security Patches (and other upgrades) for your Applications regularly (like Office, Adobe, utilities etc..).
  7. It may appear as a bit of a hassle: You may use several accounts on your PC. Make critical files and folders
    only accessible for the elevated account, using NTFS permissions (access control). If "malware" excutes,
    it often uses the credentials of the current user, (and not the elevated user) and thus protected files and directories
    are not accessible for that malware. Agreed, for a personal user it "seems" a bit like a hassle, but it helps.
  8. Document the disks/partitions for your systems. Simply using output of "bcdedit /enum" and other outputs,
    like from "diskpart" or "mountvol", will tell you which system partitions are around, which may help in case of troubles.
    Or you can use the graphical output from "diskmgmt.msc".
  9. Many tricks are around. For example:
    you can easily mount/dismount Volumes (partitions or disks) using for example the "mountvol" command.
    That way, when the malware strikes, and the volume was not mounted, those files on that volume, are unaffected.
    It seems a bit of a hassle too, for a personal user, but it can be a handy trick.
  10. Optional to consider: It's possible to use a suitable hypervisor, by which you can run a few Virtual Machines on your PC.
    If each uses it's own seperate "datastore", then it might be considered to use one for general Internet Access,
    and another one for serious work. Again, this all is a bit of a hassle, but could be quite effective.
    Those VM's must indeed be fully isolated, so in case of trouble of one VM, it does not affect the other.
    Suppose one gets "sick", it's quite easy to restore a VM backup of that object.
    If some would say "that's bad advice", I would agree to some extend, since implementing it requires
    a bit of additional knowledge. For example: Which hypervisor? How to implement it? Any additional costs? Etc..
  11. This is very trivial (sorry): Do not use unknown devices like usb disks, flash drives and that sort of stuff.
As said above, I will do my best to come up with a sort of "best practices" protocol, in order
to avoid getting "hit", as a private user, by this nasty ransomeware. See chapter 9.


This note especially is about repairing structures like bootfiles, and shows some ways to get "data back",
in case of some failure. So, the accent is certainly not on ransomware.

The main focus of this note is to understand those bootstructures in the first place,
and use Windows standard commands plus tools, which can affect the bootprocess, and perform repairs.
Also, considerable attention will be given on how to salvage "data".


IMPORTANT:

(1): If you like to perform tests, do it on a test machine. This sounds absurdly trivial ofcourse.
Indeed, certain actions might indeed be risky. Never do something with bootstructures
on an important (production) machine, unless you have no choice.

(2): If you suspect, or found clues, that points to a rootkit (bootkit) malware, which is responsible for the crash,
then check your AntiVirus manufacturer too, for (possible) procedures or "tips".

(3): Any tip or command, listed in this, or any other note, must be crosschecked with other sources.

(4): If you have a multiboot machine (physical host), which can also boot to a NON-Windows Operating System, like Linux,
then be very careful with information of this note. This note focusses purely on Windows, or multi-boot Windows systems.

Maybe the upper seems a bit exaggerated, but it's really not.
Indeed, this note is just a bunch of simple pointers, and not a "crisp and clean" handbook to perform repairs.

Main Contents:

Chapter 1. Birds eye view on the Boot sequence of Windows.
Chapter 2. How to check if your system uses BIOS/MBR/VBR or EFI/GPT.
Chapter 3. Bootmgr and BCD.
Chapter 4. Special partitions (Like "Recovery").
Chapter 5. Creating Bootable media (Repair DVD, USB with Windows PE).
Chapter 6. UEFI and BIOS/MBR.
Chapter 7. File structure and headers.
Chapter 8. Recovery using standard Windows tools and Well know error messages.
Chapter 9. Best practices to avoid damage by RansomWare.

Appendices.


Chapter 1. Birds eye view on the Boot sequence of Windows

Typically, for the (pratically obsolete) systems as XP or Win2K3, was to use a BIOS/MBR bootstrap method.
Indeed, the older partition styled disks, are often called "MBR" disks.
Most of those older Operating Systems did not yet supported the newer (UEFI) GPT diskformat for booting.

UEFI (or EFI) needs the newer GPT style of diskformat (or actually "disk metadata").
As of Vista, Windows (64) supports GPT, and for systems like Win10, or Win2K12, Win2k16, the use
of UEFI (or EFI as more often called) as the primary bootstrap, is reasonably common.

To be clear:

- booting from UEFI is/was possible for Win8 up to more modern systems like Win10.
- for Win7 and lower, we have BIOS/MBR, but for Win7, "UEFI with BIOS emulation" is possible.
There is however GPT disk support for Win7, but not for "pure" UEFI booting (with exceptions).
Indeed, even Vista had GPT support, for data disks (but not for booting from "pure" UEFI).

However, even with modern systems, it still might be true that they work from BIOS-CSM,
that is, UEFI with legacy BIOS support enabled.

Often, Firmware setup makes it possible to use UEFI, or UEFI with legacy BIOS support, in which case
the system looks like the "older style MBR format".

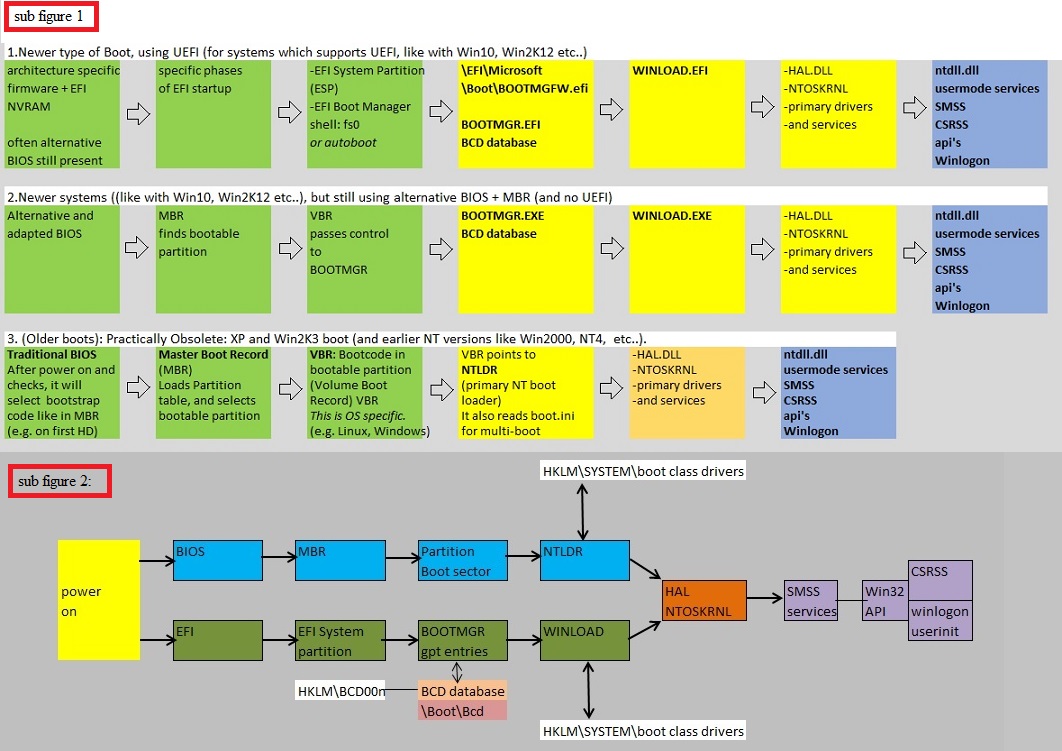
A birds eye view on the several possible bootsequences of various types of Windows (older versions and newer versions),
is shown in the figure below.

Fig 1: Just some simple illustrations of Windows bootsequences.


The sequences are ofcourse much more involved then what is shown above.
The figure then only serves to provide an impression.
However, a basic understanding of the Windows boot is important, also if you want to attempt repairs
of the bootprocess.

About BOOTMGR and NTLDR: BOOTMGR was implemented in Windows, as of Vista, thus that holds for Windows 10,
Windows 8.x, Windows 7, Windows Vista, and the corresponding Server versions.
BOOTMGR can be implemented on true UEFI systems, or UEFI in Legacy mode (emulation BIOS/MBR).

NTLDR is the Windows bootloader for XP/Win2K3 and older Operating Systems.


For the UEFI based boot, and modern systems, stuff goes "roughly" like this:
  • UEFI firware activates, and it goes through a number of stages, like a PEI, DXE phases etc..,
    which are not of interest to us.
  • When UEFI is "up", it goes to the BDS module (Boot Device Selection), while a EFI System Partition (ESP)
    is mounted too. The BDS comes from NVRAM. The ESP contains possibly various subfolders, with
    pre-boot loaders for optionally various Operating Systems.
    So, there might be a \EFI\RedHat\ and a \EFI\Microsoft\ folders present, and optionally others as well.
    In case of Windows, we have the "\EFI\Microsoft\Boot\bootmgfw.efi" bootloader on the ESP.
  • The BDS module might present a "boot menu", or is configured for an "autoboot", and it's
    possible too to evoke the "EFI shell" fs(0)> prompt.
    Microsoft calls "bootmgfw.efi", the "firmware boot manager" or "Windows boot manager".
  • Next, the "Bootmgr.efi" is called, which manages the socalled BCD store, and enummerates
    all possible bootoptions (post EFI).
  • Next, "Winload.efi" is called, which is finally responsible for loading and activating the
    Windows kernel and other critical components.
  • API's and services are putting "alive", like ntdll, SMSS, CSRSS

So, in short:

=> For the UEFI boot, and modern Windows systems, stuff goes "roughly" like this:

UEFI phases -> BDS/EFI System Partition (menu, autoboot, shell) -> \EFI\Microsoft\Boot\bootmgfw.efi ->
Bootmgr BCD store + enummerations, optional bootmenu ->
OS loader \Windows\system32\winload.efi -> NTOSKRNL -> Services + API's.

=> For the MBR/BIOS boot, and modern systems, stuff goes "roughly" like this:

BIOS -> MBR -> Volume Boot Record -> Bootmgr BCD store + enummerations, optional bootmenu ->
OS loader \Windows\system32\winload.exe -> NTOSKRNL -> Services + API's.

=> For older systems, it holds that BIOS/MBR is (mostly) used (XP, Win2K3, and earlier). Stuff goes "roughly" like this:

BIOS -> MBR -> Volume Boot Record -> NTLDR (boot.ini to present bootmenu) -> NTOSKRNL -> Services + API's.

IMPORTANT:

As we will see later in more detail, UEFI uses a seperate "EFI System Partition" (ESP). But this can coexist with an MBR/VBR structure
as it was in the older boottype.
If the UEFI pre-boot is in effect, it fully ignores any MBR/VBR bootsructures, and simply follows the path
as shown in figure 8 below. At a certain moment UEFI is up, and uses it's ESP and Bootmanager (possibly with an autoboot to Windows).

In fact, on many (Intel or Intel-like) UEFI systems, a user can switch to a BIOS-CSM (emulation), so that the traditional BIOS/MBR/VBR
initial boot, is in effect again. If the BIOS-CSM (emulation) allows it, you can switch back and forth again.
However, if already an Operating System was installed before, there are in general restrictions for switching
because the OS probably does not boot anymore (usually).

Note: On certain platforms, like Itanium, even Win2K3 could use an EFI boot. So, the distinction presented above,
is not entirely "black and white": it is less rigid than the text above might suggest.

Done...

Chapter 2. How to check if your system uses BIOS/MBR/VBR, or EFI/GPT

First, It's important to know what type of Windows boot environment is used by your system(s).
Remember that in general, we have several types of machine environments.

1. Physical computer: using the legacy BIOS/MBR/VBR sequence.
2. Physical computer: using the newer EFI boot sequence.
3. Virtual Machine: often using a virtualized "Manufacturer emulated" BIOS/MBR/VBR sequence.

The question if a machine supports EFI, is not only an Operating System issue. For example, the type of CPU and mainboard, is
often a more decisive factor.
In practice however, nowadays, most new machines are implemented with EFI.

- Note that for older systems, like XP, or Win2K3 Server, usually the BIOS/MBR is implemented.
- Newer systems like Win10, Win2K12, Win2K16 might use either EFI or BIOS/MBR but usually it's an EFI implementation

As we will see later, UEFI uses a seperate "EFI System Partition" (ESP). But this can coexist with an MBR/VBR structure
as it was in the older boottype.

In fact, on many UEFI systems, a user can fallback to a BIOS-CSM (emulation), so that the traditional BIOS/MBR/VBR
initial boot, is in effect again.

2.1 So, how do you know what type of boot your machine uses?

From the modern Windows versions, you can even check this within the GUI, from the 'Settings' menu.
From there, you can walk on to "Advanced Options" (in my view, it's not always very obvious how to get there).
Basically, on a UEFI system, figure 4 below (right side) would (likely) show an additional option to boot to UEFI firmware.


Here are several other methods, that can be used as of Vista/Win7 up to Win10/Win2K16.

Method 1:

From a (elevated) command prompt, run:

C:\> bcdedit /enum

-If you get back records like:

path..................\EFI\Microsoft\Boot\bootmgfw.efi (note this line)
path..................\Windows\system32\winload.efi (note this line)

Then your system uses EFI.

-If instead you see:
path..................\Windows\system32\winload.exe (note this line)

Then the machine uses BIOS/MBR.

Method 2:

You might check to contents of the "C:\Windows\Panther" directory (if present on your system).
Ofcourse, Windows might be installed in another partition, like D:\Windows. Obviously, then use that path.
The "panther" folder stores setup logfiles. But it's not garanteed that it's indeed present.

C:\>cd windows
C:\windows>cd panther
C:\windows\panther> dir setupact.log

This should indeed show the setupact.log logfile. But, it can be quite large. Often, it's unpractical to use notepad.
In that case, simply use a command like:

C:\Windows\Panther> type setupact.log | find /I "Detected boot environment"

But you might also try (if the log is not too large):

C:\Windows\Panther> notepad setupact.log

and then search for "Detected boot environment".

If you find something like this:

2018-01-20 17:28:07, Info IBS Callback_BootEnvironmentDetect:FirmwareType 1.
2018-01-20 17:28:07, Info IBS Callback_BootEnvironmentDetect: Detected boot environment: BIOS

Then your system uses the legacy BIOS. Otherwise the "Detected boot environment" will be shown as "UEFI".

Method 3:

This time, using graphical stuff only, goto "Administrative Tools", then "Computer Management", then "Disk Management".
An EFI partition is typically 100MB, or 300MB (or something in that order), and it should be the first partition
listed on "Disk 0". However, it is possible that the Computer Manufacturer has placed a "Recovery Partition" as well,
which might show as the "first" partition.
If you only see a "Recovery Partition", then it's very likely you have only BIOS/MBR.

The Disk Manager should display "EFI Partition" for that first partition. However, depending on your system,
this is not always true.

On other disks, besides disk0, other partitions might be present too, like an "EFI Partition" and/or "Recovery Partition".
But, at a certain moment in time, when an OS is active, only one such "EFI Partition" was the basis
for the boot of that OS.

Method 4:

This is close to Method 3.
If Windows "itself" (%SYSTEMROOT%), is installed on a GPT disk (partition), you have UEFI.
Windows on GPT, requires UEFI.

Method 5:

Almost immediately after "power on" of a PC or laptop (or other device), for a very brief moment, there might
be a message "Press xx key to enter Setup" or similar message. This might be the F2 key, or F10, or some other key.
Usually, this will bring you to the BIOS setup program. In some cases, this setup program might show you to eiher to
"enable UEFI boot" or stay at the "(legacy) BIOS boot".
If (in such menu system), do do not see any reference to UEFI, then it's safe to say that your device uses legacy BIOS.

Be aware, that if already an Operating System is installed, then do not change the boot behaviour with respect
to UEFI or BIOS. Leave the settings as they are now. Use this method (for now) only for investigation purposes.

Boot to UEFI Firmware Settings from inside Win10 (on a UEFI system):

If your system indeed would have UEFI, then the "shutdown" command (on Win10) has an option to reboot to the UEFI firmware User Interface.
If you have legacy BIOS, that option would not be available. It simply returns an error message. In the latter case, you might try:

(from an elevated CMD prompt session:)

C:\> shutdown /r /fw /t 0

Booting to firmware UI is not supported on this system.

Unfortunately, the "/fw" firmware switch, seems to be available only on Win10 / Win2K16, on UEFI systems.

Note: By using the prompt command "shutdown", you can reboot, or shutdown, your system.
"shutdown -r" will reboot, and "shutdown -s" will shutdown. The parameter "t 0" means: t=0 seconds, is "now".
Using "t x" means a delay of "x" seconds. And ofcourse, "/fw" means: go to firmware menu (on Win10).
By the way, you can either use "/" or "-", as parameter indicator.

2.2 Other tools

We can also use the low-level utility "diskpart". This powerful tool can do a lot of stuff.
See section 2.3.

=> "msinfo32", "systeminfo", "dxdiag", "wmic" prompt commands.

None of these commands are especially geared towards bootinfo. However, each of them
provides partial information on disks and BIOS, which you can use to collect information
of your system.

For example, msinfo32 would usually show you "BIOS mode: UEFI", or "BIOS mode: Legacy", among lots of other info.
However, it is not garanteed that msinfo32 gives the same info on different Windows versions.

For example, using "wmic", you can collect lots of system info like in:

C:\TEMP> wmic bios get biosversion

Now, ofcourse, Powershell comes to mind too! Maybe you like to search for some
informative Powershell CmdLet's, or scripts, which gives to UEFI and/or BIOS info.

=> "diskmgmt.msc".

You can also take a look at all disks and partitions (and check their labels en see if driveletters are assigned),
by using the Graphical utility %SYSTEMROOT%\system32\diskmgmt.msc (like C:\Windows\System32\diskmgmt.msc).
This graphical tool shows you all disks, and partitions that your system may have.

If you rightclick a disk (not a partition), and see it's properties, you should be able to see whether
it uses MBR metadata, or GPT (GUID Partition Table) metadata.

MBR and GPT will be explained in Chapter 6.

2.3 A DISKPART session.

Suppose you see some smaller partition, (and it's not the common C:, and others as D: etc..), you might wonder
if it's an EFI System Partition. Usually, it has no drive letter assigned, but you still might take a look over there.
If you indeed would use the procedure below, then it is ofcourse understood that you will not make any alterations:
That is: We are only going "to take a look" in that partition.

If you feel uncomfortable using "diskpart", then skip the subsection below. Simply just read it.
Maybe your system "looks" a bit like the example below. You can just try the same steps below.
However, do a manual boot repair, might involve a diskpart session as well.


(start an elevated command prompt session, having Admin rights)

C:\TEMP> diskpart

DISKPART> list disk
DISKPART> select disk 0
DISKPART> list partition

(suppose the output is like this:)

DISKPART> list partition

Partition.. ###..Type..........Size
Partition.. 1....Recovery......400 MB
Partition.. 2....System........300 MB
Partition.. 3....Reserved......128 MB
Partition.. 4....Primary.......237 GB
Partition.. 5....Primary.......206 GB
Partition.. 6....Recovery......21 GB

Partition 2 is 300MB in size, which is what to be expected (more or less) from an EFI System Partition.
So, mybe that's the one we are looking for. Note that an EFI partition might be labeled as BOOT,
or SYSTEM, or sometimes even as EFI etc... Well, let's go on:

DISKPART> select partition 2
DISKPART> assign

DiskPart successfully assigned the drive letter or mount point.
DISKPART>exit

Now, we have a driveletter assigned to Partition 2. In my case, it turns out to be "F:".
Let's take a look over there:

C:\TEMP>F:
F:\>dir

03/14/2013 04:27 PM DIR EFI

F:\>cd EFI

F:\EFI>dir

03/14/2013 07:45 PM DIR Microsoft
03/14/2013 07:45 PM DIR Boot
03/14/2013 07:45 PM DIR OEM

F:\EFI>cd Microsoft

F:\EFI\Microsoft>dir

03/14/2013 07:45 PM DIR Boot

F:\EFI\Microsoft>cd Boot

F:\EFI\Microsoft\Boot>dir

06/26/2012 06:05 PM.........4,186 boot.stl
04/29/2018 01:36 PM........32,768 BCD
07/25/2012 10:12 PM.....1,354,480 bootmgfw.efi
07/25/2012 10:12 PM.....1,350,896 bootmgr.efi
07/25/2012 10:12 PM.....1,263,856 memtest.efi

Take notice of the BCD directory, and the Bootmanager "bootmgr.efi" for UEFI systems.

Chapter 3. bootmgr and BCD.

3.1 The BCD store.

What is the BCD store?:

Indeed, since Vista, we are dealing with "BOOTMGR" and the BCD store.
BCD stands for "Boot Configuration Data".

=> In the old XP/Win2K3 period, and earlier versions before those versions, we had NTLDR as the loader
of the Operating System.
But you could have 2 or more Windows versions installed on your machine, and using "boot.ini",
(a simple flat ascii file which listed all versions including their paths), made it possible that
NTLDR presented you a bootmenu first, from which you could choose which instance to start.

=> In more modern versions of Windows (such as Win7, Win10 etc..), the BDC store has a similar role.
It's a registry of all installed Windows versions, including some properties as their systempaths.
However, this time the BCD store is somewhat more complex, and it's a binary file, instead of
just a simple ascii file (as boot.ini was in the XP/Win2K3 days, and earlier versions of Windows).
It's probably reasonable to say that the BCD store is a "namespace container for BCD objects" which
holds startup data for Windows systems. In a way, this file makes the Windows boot more independable
from EFI firmware, and strict UEFI specifics.

During the bootprocess, the BCD store is also loaded in memory, and later on, visible from the registry editor,
just like any other registry subhive in HKLM.
The BCD that was used to boot the current windows OS, is mounted as BCD00000000 under HKLM.

You are supposed to use some specific interfaces to the BCD store, as for example the prompt command "bcdedit".

Where is it located?:

=> BIOS/MBR:

There are still several options.

You do not have, or not use, UEFI, but instead use the BIOS/MBR bootstrap.

-Then the BCD store might be located in the systempartition, in the "\boot" folder. For example "C:\boot".
This latter location is likely to be true if you would have only one disk. Key point is, that
the "\boot" folder is stored on the "system partition", while the Windows directory itself might
be located on for example D:, or E: etc.. (such as E:\Windows etc...)

-It might also be so, that the systempartition is a smaller partition on the disk, where
bootmgr and the BCD store are located. It might be a manufacturer provided "System Recovery"
partition (or with an other name) where those files are present.
It might for example be a G: partition, where "bootmgr" might be in the root, and
a G:\boot directory iswould likeley be present too. These are all hidden (+h and +s attributes).
You might try the "attrib" command (just as is) to see more on that partition.
Or, use the explorer where "hidden" and "system" files is configured to be shown too.

=> UEFI:

-If you use UEFI (also abbreviated by EFI), then the the BCD store is located in \EFI\Microsoft\Boot,

In all cases, the BCD store closely resembles more the format of a "Registry Hive", including the hierarchical
structure with Objects and Elements.

On UEFI, BOOTMGR "must" actually use EFI services to open and read this object, and get knowledge of the objects
registered in this repository.

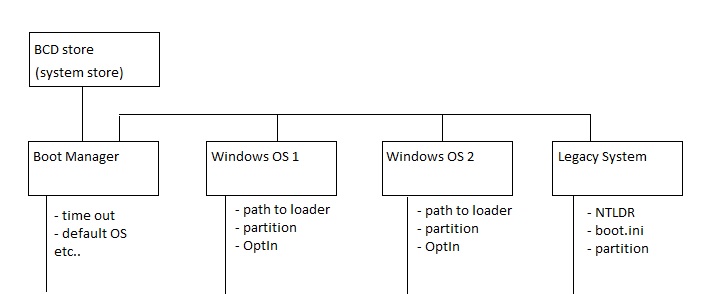
3.2 Example contents BCD.

you can compare the structure of BCD, with a root container (object), containing other containers (objects), very similar
as to a directory structure, having a root directory with subdirectories.
Or, if you like, it's very similar to a registry key (folder), having subkeys (folders) with values.

-If you have only one modern OS installed, BOOTMGR will not display a bootmenu. But there will be a certain
(small) time interval (timeout) before control is passes to the default (and only) WINLOADER.

-If you have 2 or more modern Windows (Vista or higher) versions installed, then BOOTMGR will
(per default) show you a bootmenu from which you can start the desired Windows instance.

- If your machine initially used XP or earlier, then (in case of BIOS/MBR), the BOOTMGR will still
enable you to go into the "legacy" boot of XP (using NTLDR and boot.ini etc..).
(Ofcourse, I know that XP is "antique" by modern standards, but I want to show how BCD works).

So, suppose you have 2 modern Windows versions stalled, and one older (legacy) system like XP.
Then the BCD store has a structure similar as to:

Fig 2: Just a very simple illustrations of the BCD store (2 modern OS, 1 legacy OS).


3.3 Displaying the contents of the BCD Store.

Commandline:

There are a few "native" prompt commands in Windows systems (as of Vista), which let you view
and manage the content of the BCD store. For example the "bcdedit" command, which should be
present on any modern Client- or Server system.

So if you would use the "bcdedit" command, do not expect to see the hierarchical output as shown in figure 2.
You get "serlalized", and grouped, output of the Boot Manager object, the Operating system object(s),
and all "elements" grouped together belonging to such object.

From an elevated (Admin rights) prompt, try the following three commands:

C:\TEMP>bcdedit
C:\TEMP>bcdedit /enum all
C:\TEMP>bcdedit /v

The "/v" and "/enum all" options (switches/parameters), show more output, then just the bcdedit command by itself.
It should be noted that "bcdedit" knows a large number os switches, mainly to manage (alter) the BCD store.

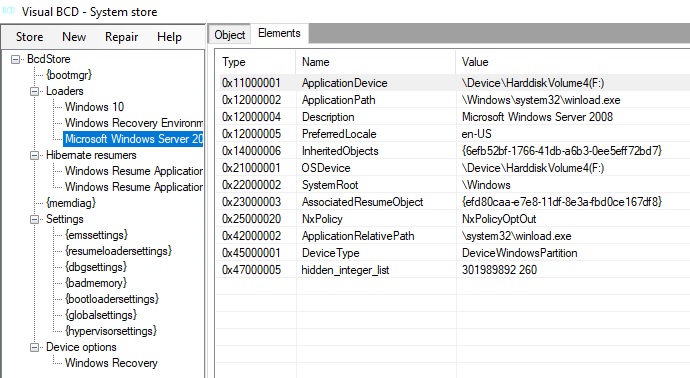
GUI (third party):

However, there also exist Third Party graphical tools to view and manage the content of the BCD store.
Their "look and feel", is often much like the Registry Editor, which shows you "keys" (folders) and values.
For example "Visual BCD", and several other tools are available. Most of them are often not "free".

Here, I will not go into those (non-standard) graphical tools. But it's important to know, that such tools exist.
I agree that such a tool might give you quite some "extra's". If interested, do an extensive Web search,
also to find out if such tool is tested thorougly on EFI too, and if it's trusted enough, for you to use it.

Fig 3: Simple illustrations of Visual BCD.


Done...


Chapter 4. Special partitions (Like "Recovery", "OEM" etc..).

4.1 Recovery Partition (WinRE partition):

Many "new" Laptops or PC's, from major Manufacturers, will already have a Windows version pre-installed.
At least, in the US and many countries in Europe, this is often true.

Ofcourse, you can also buy a true "bare metal" machine, with no software installed at all.
Having Windows installation media, then you can install the OS yourself (or another OS ofcourse).
Booting from install media, then sets you off into the installation.

Whatever your situation may be, it might be true dat you have a "recovery" partition on your
disk, which often is labeled "Recovery". It might only be around 15G in size, or even much smaller.
In other cases, you may see a label as "WinRE" or "WinRE tools".

This Partition contains Windows RE (WinRE), based on Windows PE, in a packed format, which can be
initiated and run from a RAM disk.
Windows PE is a very thin OS, only containing the basic bootobjects, kernel, API's, and tools.
The purpose is that it can repair common causes of unbootable operating systems.

If Windows is installed (e.g. by Manufacturer) using the scoalled "media created from Windows Imaging and
Configuration Designer (ICD)", a WinRE partition will be created on both UEFI and BIOS-based devices.

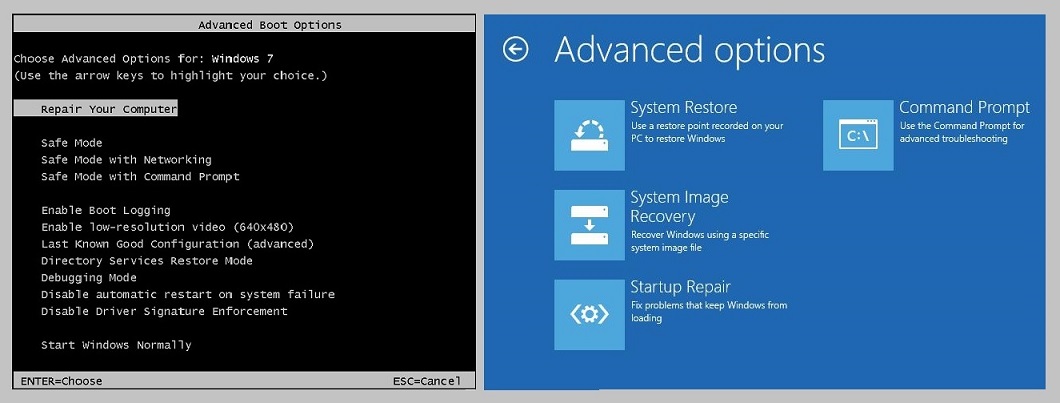
If during the regular boot of your machine, a fatal error is detected, the bootmgr may
start Windows RE, and present you a menu with recovery options (depending on the Windows version).

Fig 4: Simple illustration of the bootmenu of WinRE.


The Recovery menu will appear, under various circumstances. One is, if a critical component
of the regular Windows installation is damaged or missing. Or, after 2 (or 3) consecutive failed attempts
to start Windows. There are also many "manual" interactive ways to enter the WinRE Recovery menu.

One other thing to note is, one of standard entries in the BCD store. One points namely to WinRE
and it's recovery menu.
On your system, you might again try the "bcdedit /enum all" command. In that case, you should be able
to see all BCD objects and elements (see Chapter 3).

If I perform it on a Windows 10 machine, one part of the output is shown below:

C:\TEMP>bcdedit /enum all

..
(just an example)
(Lots of Output...)
..
identifier...... {876fd0f0-fdfe-11e7-9c09-a495dd0890af}
device.......... ramdisk=[G:]\Recovery\WindowsRE\Winre.wim,{876fd0f1-fdfe-11e7-9c09-a495dd0890af}
path............ \windows\system32\winload.exe
description..... Windows Recovery Environment
displaymessage.. Recovery
osdevice........ ramdisk=[G:]\Recovery\WindowsRE\Winre.wim,{876fd0f1-fdfe-11e7-9c09-a495dd0890af}


Do you notice the 'Description: Windows Recovery Environment" in the output above?
As you may notice too, the "Winre.wim" will be unpacked and executed from a initiated RAM drive,
while it was loaded from the Recovery partition.

Chapter 5. Creating bootable media: Repair DVD, and a USB with Windows PE.

In this section, we are going to see:
  1. How to create a "Repair" or "Recovery" DVD, using standard facilities of Windows.
  2. Next, we will create a bootable USB drive, on which we will install a "mini" Windows, namelijk WinPE.
  3. Lastly, we will make a bootable Linux DVD (Live DVD). Modern Linux distro's, today have an excellent
    GUI which you can use to easily use to transfer files from a good harddisk partition, to (for example) a USB disk.
With (1) and (2), you will have the standard "repair" options, and for example also a command prompt which you can use to copy
files to other media (like USB or DVD etc..).
With (3), you have (at least) the option to salvage files from your harddisk (partitions), to other media.

In my view, (1) and (2) are the most interesting ones, since it allows us to try a Graphically "initiated" repair,
or start a command prompt, to enter rather advanced commands to repair bootstructures (like bcdboot).
This will be the subject of chapter 8.

4.1 A note on creating a Recovery (Repair) DVD:

Sure, USB is taking over (or already did) from portable Disk media, like DVD.
In 4.2, we will see how to create a bootable USB with Windows PE.

But, having a bootable DVD with repair options is great too.

In modern Windows systems, you can create a Recovery (Repair) DVD, from which you can boot
in case of problems, and which gives you most repair options as shown in the former section.

Depending on the version, in Control Panel, or System Management, you should be able
to locate the Backup/restore applet. It also provides the option to create a bootable Recovery DVD.
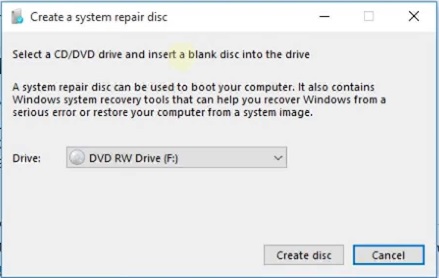
Just take an empty DVD (e.g. DVD-R), and follow the simple instructions. See figure 5.

If someone is indeed reading this note, then please create this DVD, because of an excercise
in Chapter 7.

Win10 example for creating a Recovery (Repair) DVD:

In Win10, you should be able to find such an option rather quickly from a Backup/restore applet
in Control Panel. See figure below.

Fig 5: How to create a Recovery DVD in Win10.


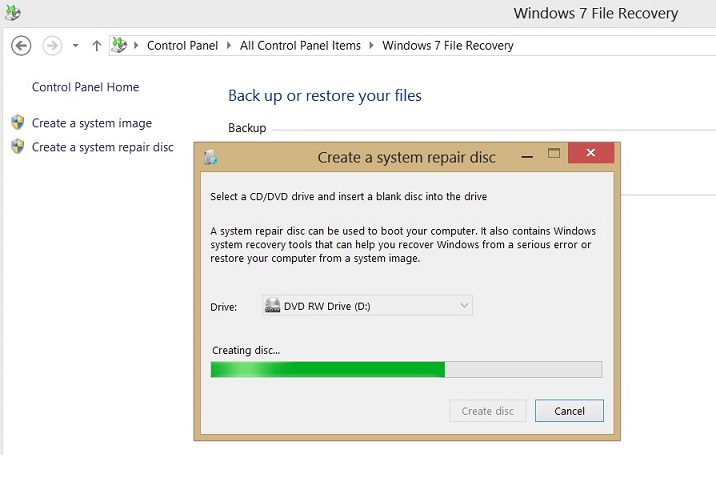
Win7 / Win8 example for creating a Recovery (Repair) DVD:

You might have to look around a bit on your system, but in this Win7 example, I found the option
to create a system repair disk (or Recovery Repair DVD) in the applet "Windows 7 file recovery". See the figure below.

Fig 6: How to create a Recovery DVD in Win7 / Win8.


The reward of having such DVD is illustrated in figure 4. For example, you can choose for "Startup Repair",
in which case the code on the DVD will inspect the bootstructures, and (hopefully) is able to repair it.

As another option, you can choose for the "Command Prompt". This is very valuable, since using
the simple prompt interface, you can save files, or use some special commands to repair bootstructures.
This is a sunbject in Chapter 7, and there we will see some simple examples to copy your valuable datafiles
to another storage object like an USB disk.

4.2 A note on creating a a bootable USB with Windows PE:

In this subsection, we will create a bootable USB with Windows PE. This example is based on Windows 10.

Windows PE (or WinPE, and a similar OS called WinRE), is a "Thin OS", with basic functionality, like
having a kernel, NTFS/FAT drivers, mass-storage drivers, networking functionality, and some API's.
What's more, after the PE boot, it runs from a RAM disk in memory. So, you could even change the USB,
for another USB stick.

In case your machine seems completely lost, you might boot using this USB stick, and access
Disk partitions which are still good, to save data.

Step 1:

Make sure you have a (reasonably modern) USB stick of sufficient size, like 6GB or 8GB.

You do not need to use DISPART to create partitions, or do anything else with this USB.

Step 2:

Download the Windows 10 "Deployment tools and Windows Preinstallation Environment".

For Windows 10, you might try (I hope that this link remains valid...):

Download and install the Windows ADK.

You can select what to download, but in fact the Windows Preinstallation Environment is good enough.

Step 3:

We are next going to use a few commandline scripts. The first one ("copype") will create a directory on your harddisk
and copy/unpack the neccessary files to that directory.
The second one ("MakeWinPEMedia"), formats the USB stick, writes a bootrecord on the USB, and copy the neccessary files
(from that directory which "copype" used) on that USB drive. That's all, actually.

Remember, this example is for Win10. For Win8, Win7, it's quite similar, but not entirely the same procedure.

From the "Start menu", run "Deployment and Imaging Environment" icon.
Basically, it starts a CMD prompt, but some essential environment variable are set too.

From this location (in my example, it can be slightly different in yours):

C:\Program Files (x86)\Windows Kits\10\Assessment and Deployment Kit\Windows Preinstallation Environment>

Run:

copype x86 c:\winpe

In my case I have x64 machines, but in the mindset of "copype", x86 and x64 is all collected in the parameter "x86".
Also, on the commandline I told "copype", to place the objects in "c:\winpe".

After "copype" is ready, next run:

MakeWinPEMedia /UFD c:\winpe H:

where (in my case) H: is the drive letter associated with the USB drive.

In the "MakeWinPEMedia" session, we will see:

WARNING, ALL DATA ON DISK DRIVE H: WILL BE LOST!
Proceed with Format [Y,N]?Y
Formatting H:...

Setting the boot code on H:...

Copying files to H:...

Success

So, we managed to create a bootable (Win10 based) "Windows PE" environment, which will boot
into a graphical "mini" Windows, which per default will also start a cmd window.
It's pretty cool to have a bootable USB, with full disksupport.

In case you have a BIOS machine, (or BIOS/UEFI machine), in setup, you can change the order
of bootable devices. For testing purposes, you can put USB as the first bootable candidate.

4.3 A Linux bootable (Live) DVD:

Nowadays, it's easy to download a Linux ".iso" file, which you can burn to a DVD.
This DVD then (most often) is bootable, and you can start a Linux distro from DVD.
Such downloads are also often called: an .iso file for creating "Live DVD".

Most distro's today have such an easy GUI, with filemanagers, which can readily access your
FAT/NTFS harddisk partitions (like C:, D: etc..). This way, you can always copy files from your harddisk
to other media, in case of "misery".

Today, there exists a dazzling amount of Linux distro's. However, as I see it, it looks like many folks
are rather fond of Ubuntu. So, let's use that Linux distro as an example.

But in fact you can use any Linux distro, as long as you can create a bootable Live DVD, or Live USB
from which you can start that Operating System.


Often that means:

-Downlaod the .iso file.
-Once downloaded, burn it to a DVD. You can use "burning" software, but most windows versions
can burn a DVD for you too. From explorer, simply rightclick the .iso file and see if a "burning" option is listed.
-Boot the device from the DVD (possibly you need to adjust the bootorder in BIOS, or UEFI-CSM (see chapter 6)).
-Now you can test if you can indeed boot from that DVD, and if Linux starts, and if you can access files on the harddisk.

You can try to download the desktop version of Ubuntu, using (for example) this link.

-Simply download the .iso.
-Burn the DVD.
-Boot from DVD.
-It's possible that the software shows a screen asking if you want to install, or just want to work.

Ofcourse, do not install Linux, but simply start the software.
Try if you can indeed copy datafiles from your harddisk, to, for example a USB drive.

Note: software like "Rufus".

There exists free utilities, like "Rufus" which can create a bootable USB drive too,
. for example based on Windows. You then only need a .iso file, like for example the Win7 .iso file.
Rufus is quite simple to use, and might be a great help too.
You are strongly encouraged to do a Websearch on Rufus (or similar tool), to widen your toolkit
for creating bootable media, and to make you stronger in case you need to perform repairs or salvage data.

Done...

Chapter 6. UEFI boot and BIOS/MBR boot.

I am not sure if this short chapter, is really good "digestible". I wrote it some time back,
and when I read it today, then it seems not so fantastic to read.. Technically, it's OK.

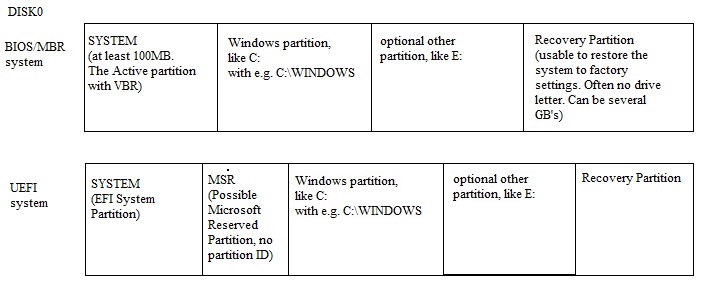
So, you can skip this chapter if you want. But then I would like you to take at least a look
at the figure below, just to get an impression on partition layouts of typical BIOS/MBR- and UEFI machines.

Fig 7: Typical (standard) partition layouts of DISK0 on PC/Laptop.


The figure above is just a sort of archetype for DISK0, for any reasonably modern (or very modern) physical machine.
However, your system might show different sort of layout.

But, if you like to try this chapter... please do so!


Associated with UEFI, are GPT disks, or GUID Partition disks.

The GPT metadata on such disks, is much "larger" and more flexible, than the MBR based disks.
One enhancement of GPT for example, is breaking the 2 TerraByte (TB) limit, so partitions on such GPT disks
can be much larger than 2TB.

So, UEFI uses GPT disk(s). However, since the GPT metadata makes GPT disks completely "selfdescribing", also
the older BIOS/MBR machines can also use GPT disks, but not for booting the initial Operating System.
For such older systems, we simply need the traditional MBR/VBR initial sequence.

Let's take a closer look at both systems (UEFI boot and BIOS/MBR boot). Let's start with the older one.

6.1 The traditional BIOS/MBR initial boot.

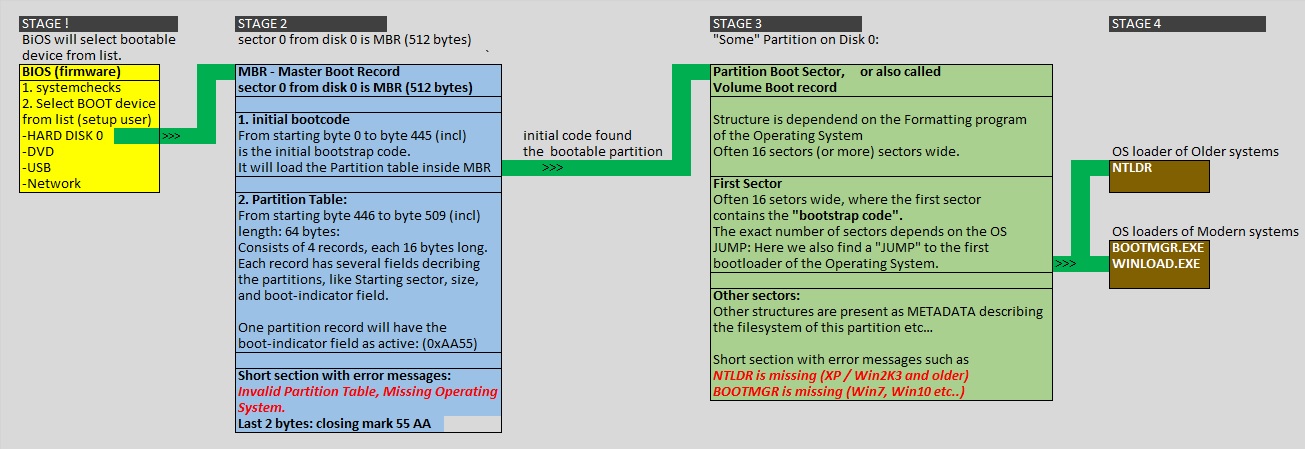
Please take a look at the simplistic picture below.

Fig 8: Jip and Janneke illustration of the initial BIOS/MBR/VBR boot.


After POWER ON, the device will perform some "self checks". Then, the BIOS will determine
the order of "bootable devices". As you may know, in the traditional BIOS setup, you can specify
the order of bootable devices. That's just a simple listing like
DVD, USB, Harddisk0, network etc.. Usually, the first harddisk is chosen, and listed as the
first device which the BIOS will check for the "initial bootcode".

In that case, the BIOS will load the very first sector (MBR) of that disk in memory, and transfer
control to the "initial bootcode" in that sector (which is the MBR).

This code is very small, and has as a main purpose to read the "Partition Table", which is also
stored inside the MBR.
The traditional "Partition Table" has 4 records, each containing various fields.
One of the fields is the "Boot Indicator" field, which marks, or "flags", a certain Partition as bootable.

So, the "initial bootcode" now has knowledge of which Partition is bootable, and it "jumps"
to the very first sector in that Partition. In effect, it transfer control to the code
stored in the very first sector in that Partition.
Actually, this "Partition Boot Sector", or also called "Volume Boot record" (VBR) is quite complex.

It's multiple sectors wide, and various parts has certain dedicated functionality, like e.g. storing
all sorts of metadata of the filesystem on that Partition.
The exact layout of "Partition Boot Sector" is dependent on the type of Operating System.

Anyway, the first sector of the "Partition Boot Sector" is special, since it will locate the
"true" OS loader. This OS loader will be BOOTMGR/WINLOAD on Vista/Win7/Win8/Win10 machines
and ofcourse also with the corresponding Windows Server variants (as Win2K8, Win2K12 etc..).

When we would study the boosequence of older Windows machines (XP/Win2K3 and earlier), then
the code of the "Partition Boot Sector" would locate the "true" OS loader of those sort of systems,
which would be NTLDR.

Anyway, basically, the above describes the BIOS/MBR/VBR boot in a very lightweight fashion.

The MBR (or Master Boot Record), is simply an intermediate structure. If, for example,
a bootable device is not Partitioned (like a antique Floppy), then the BIOS transfers control
directly to the first sector of that bootable device (same sort of code as the first sector of the "Partition Boot Sector"
of a partition on a harddisk.

In figure 4 above, I labelled the various phases as Stage 1 up to Stage 4. What happens after Stage 4, is the
loading of the Full Operating System, like loading the Kernel NTOSKRNL, reading the Registry, loading
primary drivers/services, loading API's like NTDLL, CSRSS, SMSS etc..
You might refer to figure 1 for that.

My apologies for this very simplistic description. However, I consider this to be sufficient for understanding
various error messages of a BIOS/MBR machine would not boot correctly anymore.

For example, the MBR and VBR (or "Partition Boot Sector"), have various locations reserved for basic error messages.

So, if you see the message "Missing NTLDR" on XP, then the VBR cannot locate that File, or the VBR is faulty.
Similarly, if you see the message "Missing BOOTMGR" on Win7 (or later version), the same story applies.
Ofcourse, that holds for BIOS/MBR/VBR machines. But we know that we probably do not need to fix the MBR,
but instead, we must repair the "Partition Boot Sector" (or also called the "Volume Boot record).

Notes:

Note 1:

-Some folks name Stage 1 + Stage 2 + Stage 3, all together, the "IPL" or Initial Program Load.
-Some folks name the bootcode in the VBR, the "bootstrap" code.
-Some folks name the "initial bootcode" in the MBR, the "bootstrap" code (seems most folks choose this one).
-Some folks name the "initial bootcode" in the MBR, plus the bootcode in the VBR, the "bootstrap" code.

Note 2: About the Max Partition size in BIOS/MBR systems.

A 16 byte Partition Entry, in the MBR, has the following structure:

Lengt (bytes): Content:
1 Boot Indicator (80h=active):
3 Starting CSH
1 Partition Type Descriptor
3 Ending CSH
4 Starting Sector
4 Partition size (Sectors)

The last 2 fields express the problem. For example, the "partition size" (in no of sectors), is 4 bytes (32 bits) long, so it
can have as a maximum value "FF FF FF FF" in hex, which is "4294967295" in decimal. So, when using 512byte sectorsize,
this amounts to about 4294967295 x 512=2.199.023.255.040 bytes, or a maximum partition size of about 2.2 TB (2 TB).

6.2 The UEFI initial boot.


Modern systems are usually equipped with UEFI. Windows Operating systems, 64 bit, as of Vista SP1,
supports UEFI.

However, if needed, a fallback to BIOS is often still possible, due to certain extensions,
which are called the Compatiblity Support Module (CSM). This partly emulates a traditional BIOS system.

Using keys like F1, or F11, F12 or other key (specific to your system), you can enter this legacy BIOS setup,
and it's often possible to "enable/disable" UEFI (partly), meaning that you fallback on BIOS, for booting.

Important: If already an OS was installed using UEFI, and UEFI then afterwards gets disabled in favor of the legacy boot,
then that OS will not boot, unless you enable UEFI again. Also, after this, installing a legacy OS on such enabled BIOS system
is rather "tricky", because a serious risk exist that your system will be modified due to that legacy OS install.
In particular, you should not (let) "destroy" the EFI System Partition (ESP).


UEFI is a more complex "startup method" or interface, compared to the traditional BIOS.
However, there are certainly improvements in using UEFI, like in using a larger bootdisk (> 2TB),
and better security features during the startup phases, and in general, the startup is a bit faster.

In this note, it is not neccessary to go into depth. However, a reasonably "good" birdseye view is vital.

The following is very important:

As we will see below, UEFI uses a seperate "EFI System Partition" (ESP). But this can coexist with an MBR/VBR structure
as it was in the older boottype.

In fact, on many UEFI systems, a user can fallback to a BIOS-CSM (emulation), so that the traditional BIOS/MBR/VBR
initial boot, is in effect again.

Fig 9: Jip and Janneke illustration of the initial UEFI startup.


In one sentence: EFI is often defined as an interface between an operating system, and platform firmware.
It's best to view EFI as a modular structure, consisting of "certain parts", like a firmware interface, a bootmanager,
an EFI systempartition, and support for a drivermodel using EFI Byte Code (EBC).

The hardware must be suitable for using EFI, so, really old x86 systems are not usable, but x86 is not excluded.
However, if the hardware is supported, it is still possible (if you would insist) to run legacy BIOS Operating Systems,
"thanks" to compatibility modules like CSM. However, UEFI is targeted for BIOS free systems.

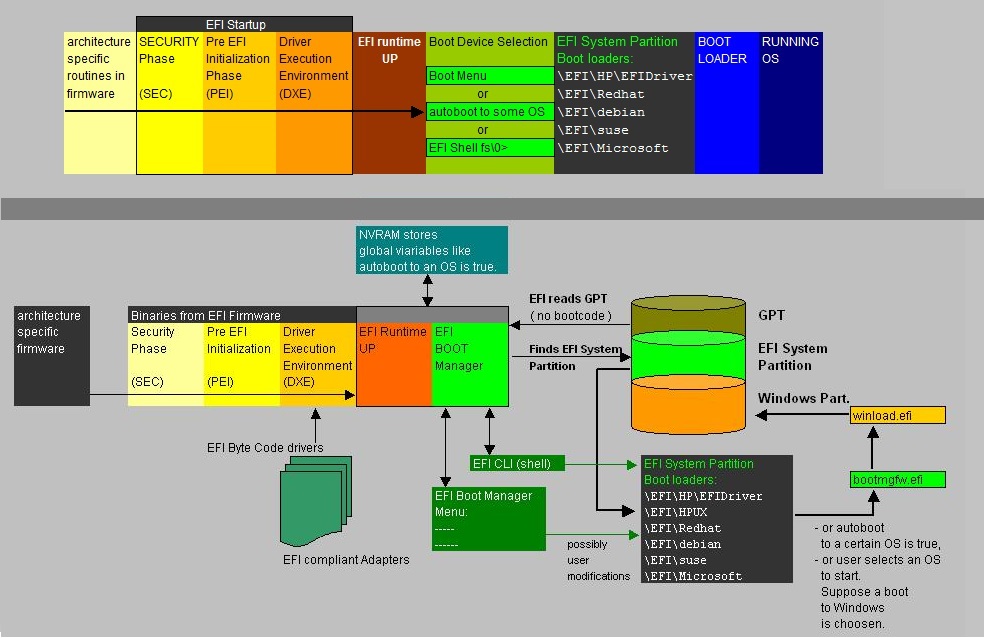
After a system is powered on, very globally, the following happes:

First, some system dependent routines are activated, like for example "IMM" initialization on a IBM System X,
where at the last stage, UEFI code is called. So, each architecture uses it's own very specific non-UEFI initial routines.

Next, the Security (SEC) phase, Pre-EFI Initialization (PEI) phase, and then the Driver Execution Environment (DXE) phase
are executed in sequence.
In reality, those phases are really pretty complex, but for our purposes, it not neccessary to go into the details.

During the DXE phase, EFI Byte Code drivers might be loaded from any firmware flash, or could come
from UEFI-compliant adapters. A device tree is build, for OS'ses that can use it.
This is important, since modern OS'ses uses that device tree.

After UEFI is fully up, the UEFI Bootmanager is called (part of BDS). Note that on an UEFI system, actually 2 Boot managers
are present. The UEFI Bootmanager, and if Windows is booted later on, the Bootmanager BOOTMGR of Windows.
But, most often, an auto-boot (configured in NVRAM) is set, so that UEFI transfer control to the Windows BOOTMGR.

During the "Boot Device Selection" (BDS) or Bootmanager, it might happen that:
  • might be configured for "autoboot"to some OS (parameter in NVRAM).
  • Or, the system might enter a "bootmenu"
  • Or possibly enter the EFI "Shell", which is a command prompt.
With respect to the autoboot: just like with Open boot or Open firmware, NVRAM can store several variables,
like whether "autoboot" to some selected OS should take place.

Certain tools exist, with which you can view and edit the boot options in EFI NVRAM. See Chapter 7.

I hope that you can (sort of) "match" the text above, with the illustrations in figure 8.

If you have indeed read all the stuff above, up to here, we are ready to investigate Recovery options
in case there is a problem with the startup of Windows.

Done...

Chapter 7. File structure, headers, Stacks and Heaps in Windows (some supportive theory).

A "quick note" on stacks and heaps:

Here are a few notes on system details like "stacks" and "heaps", which concepts are quite important in our study.

Modern development environments (like C#) are business oriented: the developer does not deal anymore with
heaps and stacks, in the way the traditional programmer did (like in using "C").
Even maintenance on objects and memory areas are nowadays "covered" by a Garbage Collector process, which may
destroy objects if references to the objects are zero, or it may use other "triggers" for cleaning memory.

However, even in modern environments, under the hood stacks and heaps are still used on the system level.

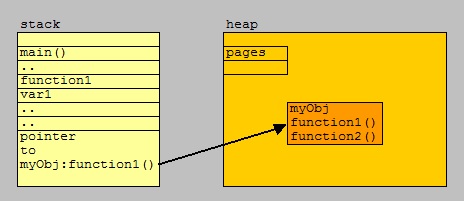
⇒ The "stack" is the memory set aside for variables and function addresses, for a thread of execution.
Each thread created, gets attached to it's own stack. When a function is called, a new block can be used on
top of the stack.
A stack is relatively small (compared to a heap), and is a "sort of map" of the running code, containing "pointers".

⇒ "Heap" is the usual name for the larger "free space", the memory space where dynamic objects are allocated.
File pages are loaded here, as well as programmatic "objects", and other stuff the program needs or creates.
It's much harder to keep track of used/unused blocks in the heap, compared to the simplicity of stacks.

Typically, a process has one (or a few heaps), while each thread has its own stack.

when you use a function call for a new "object", the memory for the object is allocated from the heap. However, pointers
to internal methods are "stacked" on the stack.

Normally, When a new object is instantiated this way, you will be allocating memory from the heap
but you need a pointer (sort of variable) to store the location (in the stack).

The figure below tries to illustrate the difference between a stack and a heap.

Fig. 10. High-level illustration of Stack and Heap.


Stacks are for the small "things": variables, addresses for functions. Heaps is for the larger "things":
objects, filepages and that kind of objects.

In case of objects and that sort of "stuff": A stack "says" where the stuff is. A heap stores stuff.

A "quick note" on Program Load:

Here are a few short descriptions of a program load:

⇒ A WinApi program:

When an executable is started, a new process is created. Each process gets a virtual address space.
In this address space various things are loaded or created by Windows, before the executable can run.

Among which are:

- All Windows needed libraries (kernel32.dll, user.dll etc...)
- The executable itself
- All the libraries that the executable imports
- The Process Environment Block (PEB), which stores information about the process
- A Thread Environment Block (TEB) for the main thread
- A stack for the main thread
- One or more heaps (often one, sometimes two)
- a stack for each new thread.

Viewed from a "file format" perspective, the executable file (.exe, .dll., .sys, .drv, and others) uses
the PE (Portable Executable) header, which also carry information about the sections in other parts of the file.
In a way, it resembles a sort of index.
One important field is the RVA, or the "relative virtual address". It specifies the offset of the "entry point"
relative to the loadaddress of the file. This sort of "explains" how an executable gets "running".

⇒ A DOT NET program:

From a logical view, .NET executable is an "assembly" and is more or less a selfcontained solution.
It runs "in" the Common Language Runtime (CLR), which is a runtime environment for .Net applications.
The development environments, will take care that the source code get's build to MSIL bytecode,
which "is fit" to run in the CLR environment.
This situation is really somewhat (or quite a lot), from a logical perspective, comparable to the Java platform.

Another thing is, that the .Net programmers do not have to deal with thread management, heaps etc..
that will all be done by the .Net environment. From a hard technical viewpoint, heaps, stacks, threads
are still there, but not in immediate sight of the developer.

Viewed from a "file format" perspective, the executable file has an extended PE header, with CLR sections,
which plays a similar role compared to the traditional executables.
Certainly, a program gets it virtual address space, and the RVA again points to the entry point.
There are entry points (like importing) to .Net core files as well (e.g. mscoree.dll).

⇒ Scripts:

There are many scripting environments, right from the command prompt, like "perl", vbs, etc...
or native cmd scripts like DOS (cmd) batches etc..

Nowadays, most people think ofcourse on Powershell on the Win platform.

Indeed, the same power is available from Powershell scripts as with "real" programming environments.
From Powershell, you can use any available API around, which in principle makes it possible to do
anything the script wants (only limited by permissions, policies, ACL's etc...)

Example powershell code, using Win32:

function MyApiCall {
$Signature = @"
[DllImport("user32.dll", EntryPoint = "ChooseTheEntryPointYouNeed")]

This is only to attend you on the fact that, in principle, it's possible that an unknown script
may cause very undesired effects.

Ofcourse, this is not "new" news, but I liked to mention it anyway.

⇒ High level macro's for applications:

I hope you do not think that I see monsters everywhere. But macro's, like possible in Excel,
can not only perform great stuff within Office itself, but can use several API's too, like Win32.
It means that an office document send to you by "evilsite.com", and you open it, even simple stuff
like macro's may cause undesired effects (only limited by permissions, policies, ACL's etc...).

Ofcourse, this is not "new" news, but I liked to mention it anyway.

⇒ Well-know document containers like pdf files:

I hope you do not think that I see monsters everywhere.

Adobe provides a SDK, in order to develop a high degree of automation, or Server based apps etc..
It's a great platform, to develop usefull apps. Ofcourse, the "Reader" is wellknown to everybody.

Even the Reader must be patched to the highest level. There are some anekdotes with older versions,
where the reader opened an infected .pdf file, causing the reader to crash (due to CVE-2008-2992),
while simultanously, ransomware from the infected .pdf took over.

Ofcourse, there is nothing wrong with Adobe apps. The example only serves that malware transmission
using .pdf, even today, in principle is still possible. Also, put your software to the higest patch level.

All the items listed above, indeed tells us that e.g. an email attachment, like an Office document,
or pdf file, might contain nasty code.
I don't see "monsters everywhere", but the above is simply a fact.
Good anti-malware/AV software, with automatic updates, should help here, but still is not 100%.
Therefore, carefully implemented permissions, policies, ACL's etc..., are indispensible too.

Chapter 8. Recovery using standard tools. Including PE

Before you do anything...

If you have a working device, or devices, it's a good idea to "document" the disk partitions
there are on these devices.
It may help to make the right choice when you must use a "repair command".
There are many ways to do so. You can start disk manager, by using "diskmgmt.msc"
from the prompt. Then you are able to graphically view the disks and partitions, including the EFI
(if it is present), and all other partitions. Save the output, or print it, and store
that output at another location.

Or use e.g.:

From an elevated command prompt:

C:\> diskpart
DISKPART> list volume

Or use commands like:

C:\> bcdedit /enum

C:\> mountvol


To repair bootstructures, there are (at least) five standard ways (thus immediately provided by Windows itself)
to achieve this. Other approaches exist too, like using "Third Party" tools, or (free/open) "Public domain" tools.

Specialized "forensic" tools exists too, but are a bit harder to get.

Those five standard ways are:
  1. Using the Recovery DVD, which enables you to initiate repair options (graphically), or to go
    to a prompt in order to enter repair commands. Or you can use the commandline to copy data from good partitions.
  2. Using a bootable USB disk, which gives you the same options as (1).
  3. Using a "system image recovery", which can restore the whole environment (if you have such image backup created previously).
  4. And, if Windows is damaged in some way, it might automatically boot into a recovery menu, such as shown in figure 4.
  5. And, if you have the original install media (like DVD), you can indeed boot from that media, and go into a recovery menu,
    such as shown in figure 4, or go to the commandline.

6. A sixth option is to use any suitable linux Live (bootable) DVD or USB.
It gives you at least options to copy data (using a graphical filemanager, or commandline).

7. And, "Third Party" tools, or (free/open) "Public domain" tools, gives a wealth of other options too.

This is certainly not a complete listing of options, to get out of a miserable situation. There are countless
of clever boys and girls who have blogs and sites, providing valuable methods and tips.
It is strongly advised to take some time and thorougly search the Net for such extra methods and tips.

But always crosscheck some found tip/method with other sources. This applies for stuff written by me, too.

8.1 Recommended First Step.

If some serious error had occurred, then the following is my recommendation.
Nothing is "perfect", and that applies for recovery commands and other repair options too.

What I advice is: Before performing any repairs, first see if you can copy your data to external media.

If you have recent data backups, then this section is not important. The same is true if you
store data in cloudservices. However, if you have valuable data on your local harddisk(s), then
I advice to do this step first.

Use (1) or (2), or (6) to copy your data (word docs, excel files, photo's etc.. etc..), to other media
like a portable USB disk or other media.
For example, options (1) and (2) enables you to start a prompt, from which you can
easily "copy" or "xcopy" datafiles to other (external) media. Indeed, (6) also provides for command line,
and a graphical filemanager too. Also, from multiple options above: once a "mini" Windows is "up",
you can use your favourite tools too from USB or DVD.

A bootable live Linux DVD might be great too, as we have seen in Chapter 5. It might help copy your data
to a save place before starting any repairs.

Thus, if for some reason, any repair fails, then you still have your data, since you have previously copied it to a safe place.

Yes, I am a bit paranoid when it comes to data. Most of the time, I worked as a DBA or SysAdmin, and to be able
to restore (for example) production databases perfectly, 100% garanteed, is the main duty.

Secondly, here we have "some" Albert, writing a silly note as he usually does. Suppose, in case of some error,
you immediately start using some powerful repair command. Suppose it messes up your system further (nothing is perfect),
before you tried to save data first. Then we have a really unpleasant situation.
Thus: Albert says: if needed, backup the data first.


If your data is stored in the "cloud", then this section is not so important. Also, if you already have recent backups,
you can ignore this step too. Even if PC/Laptop data is in the cloud, I advise to have some local backups too.
In effect, you must be 100% sure your data is safe. In effect, do not be completely dependent on Cloud stuff.

Note: Your data is the most valuable asset ofcourse. However, some folks have invested an enormous amount
of time and effort to configure all sorts of difficult applications to work with windows.
Saving application configuration files, for example all sorts of .cnf, or .xml files etc.., might be worth wile too.

8.2 Repair using commandline tools.

First a few important remarks. Please read them carefully:

Remark 1:

As we know, UEFI uses a seperate "EFI System Partition" (ESP). But this can coexist with an MBR/VBR structure "elsewhere",
as it was in the older boottype.

-If the UEFI pre-boot is in effect, it fully ignores any MBR/VBR bootstructures, and simply follows the path
as shown in figure 8 above. At a certain moment UEFI is up, and uses it's ESP and Bootmanager (possibly with an autoboot to Windows).

In fact, on many UEFI systems, a user can fallback to a BIOS-CSM (emulation), so that the traditional BIOS/MBR/VBR
initial boot, is in effect again.

-If BIOS-CSM is in effect, the EFI preboot will run, but stops just before the "Boot Device Selection" (BDS) or Bootmanager phase.
Control is passed to emulated BIOS. The usual BIOS/MBR/VBR sequence will run.

It's thus possible to switch between UEFI and BIOS-CSM, using some initial setup (if the device allows it).
In fact, you can switch forth and back again. Only an initially installed OS, that was setup for UEFI or MBR,
might not boot if you switch between UEFI and BIOS-CSM. If you want it to boot, you must switch back again.

Remark 2:

Please be advised that some errors may seem to suggest that a certain important file (like "winload")
is missing or corrupt, but in many cases, there might be something wrong with the BCD store.

This can happen, for example, in a multi-boot configuration having multiple Windows versions. The BCD store might
miss an entry that points incorrectly to one of those Windows versions (the one that does not boot).
Ofcourse, you should "somehow logically" be able to explain it, for example, the effect occurred after a second install.

However, files can indeed be missing or have been corrupted.

Remark 3:

It's important that you have created Bootable media (Repair/Recovery DVD, USB with Windows PE, Linux Live DVD/USB),
as described in Chapter 5, or other procedure. You should also have tested that you can indeed "boot" from those media.

Remark 4 (paranoia and warning):

(1): If you like to perform tests, do it on a test machine. This sounds absurdly trivial ofcourse.
Indeed, certain actions might indeed be risky. Never do something with bootstructures
on an important (production) machine, unless you have no choice.

(2): If you suspect, or found clues, that points to a rootkit (bootkit) malware, which is responsible for the crash,
then check your AntiVirus manufacturer too, for (possible) procedures or "tips".

(3): Any tip or command, listed in this note, must be crosschecked with other sources, for safety.

(4): If you have a multiboot machine (physical host), which can also boot to a NON-Windows Operating System, like Linux,
then be very careful with information of this note. This note focusses purely on Windows, or multi-boot Windows systems.


The following commandline "commands" (or tools), are of interest:

Tool Environment:
bootsect BIOS/MBR/VBR
bcdboot UEFI or BIOS/MBR/VBR
bootrec UEFI or BIOS/MBR/VBR
bcdedit UEFI or BIOS/MBR/VBR
sfc Just a filechecker.

Welcome to the colorful World of Microsoft repair commands.
Well, which one to use? Do they overlap? Or are some phase out?

Often a "yes" and "no" answer. However, since the impact of such commands can be very high, I have waited
quite some time with this section, until I felt quite comfortable. But, I am not the "Almighty",
so even here I still have some issues. It's important that you, if you only want to test, that you do that SOLELY
on a testsystem.
And especially it's important that you have bootmedia available (for the target OS), which works.

For the latter: You may have the installation media, or you have created a bootable device,
(like DVD, usb) as was discussed in Chapter 5.

Let's take a look at the commands listed above.

The "bootsect" command:

-Limitations: This one is for BIOS/MBR systems only, in "XP, Vista, Win7, Win8 realm". Rather limited in options.
-Recommendation: NOT use it on any Win8.x/Win10 system. It's basically a "Vista" tool.
-Better Alternatives Win8.x/Win10: bootsec, bcdboot.

I have seen some articles where folks described the usage on EFI/GPT. I can hardly imagine that,
but I am not the "Almighty".

If you ask me: it's for BIOS/MBR systems only.

So, if you see any article about "bootsect" in combination with EFI/GPT, then please be on guard!

It can for example be used, if the VBR links to BOOTMGR (like of Vista, win8), and you need to relink it
to NTLDR (older Windows systems) and the other way around.

Thus, it's a command-line utility that updates the (or a) "Partition bootsector" (VBR), and supposedly
updates the MBR to be fully nt52 or nt60 compatible (if used with the /mbr switch).
However, it seems that there exists no "mbr effect" whatsoever. So, "bootrect" seems to be a bootsector utility only.

So, there will not be much attention to this command anymore. Ofcourse, there can be situations
where one really needs it.


It can be found (or should be around) on:

-Windows Vista DVD, Windows 7 DVD, Windows 8 DVD
-Windows 7 System Repair Disc, Windows 8 System Repair Disc or Recovery Drive.
-WinPE created media of Vista/Win7/Win8

It's easy from MS Docs to find the full syntax:

bootsect {/help | /nt52 | /nt60} {SYS | ALL | [DriveLetter:]} [/force] /mbr

If you are a bit like me, it's suspicious that we only have the /nt52 and /nt60 switches.
So, it's a command usable in the realm of "XP, Vista, Win7, Win8" compliant Operating systems.

Examples:

Example 1:

Bootsect can be used to repair the XP compliant boot sector, like in:

D:\boot\bootsect /nt52 E:

In the upper example, I booted from DVD (D: drive), and made "E:" for XP bootable again.

But there are considerations. If you also had a BOOTMGR system, then the upper command
may have trashed that !
So, if there was a condition that XP absolutely needed to get runnable again,
then you may have considered using it. Ofcourse, here I am talking of a situation
where simply adding an entry in BCD (with bcdedit) would not have worked.
Indeed: applying a command as above should be done in a rather "rare" situation.

Example 2:

Bootsect can be used to repair the Win7/Vista/Win8 compliant boot sector, like in:

D:\boot\bootsect /nt60 SYS

or for example:

D:\boot\bootsect /nt60 E:

In the upper example, I booted from DVD (D: drive), and made "E:" for Win7/Vista/win8 bootable again.

In this case, the target operating system installed on SYS, or "DriveLetter" must be Win8, Win7, or Vista,
or the corresponding Server OS. Take note of "target", meaning the oS you want to be bootable again.

The "bootrec" command (for Win8.x/Win10):

If you have read the text above, then you must certainly have concluded that a large degree
"of fear of data loss"
, haunts my mind.

I have always said that you first try to boot the system with either:

{install media | repair disk | bootable usb (or other) | Linux Live DVD},

and try to copy (salvage) your true data to a save place. Data is the most important thing. After that, comes repairs.

As a second step, we will next try to repair the bootstructures on the PC/Laptop.

Win7, Win8/Win8.1 are most often to be found on a Legacy Bios system (UEFI with legacy BIOS emulation, BIOS-CSM).

However, Win8/Win8.1, and certainly Win10, can be found on UEFI, that is: using the EFI bootloader on GPT disk.

In Chapter 2, we have seen a few methods on how you can check that.

⇒ For Win7, Win8/Win8.1 and Win10 on a Legacy system, with booting problems, we can try the following procedure.

Windows 7 will always be a "strange thing" with respect to EFI. Windows 7 SP1 X64, can use EFI, but I will not
burn my hands on saying that all Win7 instances support EFI. Fort example, Win7 x86 will not work with EFI,
and can only use UEFI with Legacy BIOS emulation.

For Win7, Win8/Win8.1 and Win10 on a Legacy system, with booting problems, we can try:

1. Boot from install media, or repair disk, for that OS exactly..
2. Always first try the option "Startup Repair".

If at startup, your error message only was "BOOTMGR is missing", then likely steps 1 and 2,
should have solved the issue. Then reboot the machine to see if it worked.


-If the upper did not worked: Boot from install media, or repair disk. Go to command prompt.

Enter the following commands:

bootrec /fixmbr
bootrec /fixboot
bootrec /rebuildbcd

⇒ For Win7, Win8/Win8.1 and Win10 on a EFI system, using the EFI bootloader:

The procedure is somewhat different:

1. Boot from install media, or repair disk, for that OS exactly..
2. Always first try the option "Startup Repair".

If at startup, your error message only was "BOOTMGR is missing", then likely steps 1 and 2,
should have solved the issue. Then reboot the machine to see if it worked.


-If the upper did not worked: Boot from install media, or repair disk. Go to command prompt.

We need to have a driveletter, assigned to the EFI partition. Since it uses FAT32,
there is no problem assigning it a driveletter (and thus "mount" it, and make it accessible for us).
Usually, "diskpart" can do that job:

Command: Comments:
F:\> diskpart Let's start a "diskpart" session
DISKPART> select disk 0 We need to focus diskpart on DISK0
DISKPART> list volume We need to see which partitions are on DISK0
DISPART> select volume "number" Select the "number" of the EFI partition
DISKPART> assign The EFI partition now has a drive letter. Let's assume it's "E:".
DISKPART> exit We may leave diskpart right now.
F:\> e: Change the drive to E: (the EFI partition).
E:\> cd \EFI\Microsoft\Boot Go to the boot directory.
E:\> bootrec /fixboot Repair the Boot Record.
E:\> ren BCD BCD.save Let's make a save copy of the BCD store, before we recreate it.
E:\> bcdboot c:\Windows /l en-us /s E: /f All Here we assume Windows is on C: and the locale is US English.

True, we now need to see some specifics of the "bcdboot" command.
Indeed, in order to understand the options with bcdboot, see the section below.

The "bcdboot" command:

As of the moment BOOTMGR was implemented in Windows (Windows 10, Windows 8.x, Windows 7, Windows Vista,
and the corresponding Server versions), the "bcdboot" command was available.
Ofcourse, in more modern Windows versions, the "bcdboot" command have slightly more options
(commandline switches) to offer.

It can be used at BIOS/MBR and EFI machines. Later variants are "EFI aware", and for some usages,
it can even by itself determine whether it's actions must apply for a BIOS/MBR or EFI machine.
As you know (and for example can be seen in figure 1), BOOTMGR is implemented as of Vista,
for legacy BIOS systems, as well as for EFI systems.

It will not rebuild true bootsections, but it can create, repair, modify everything that has
to do with BOOTMGR, the BCD store, and bootmenu's (in case of multiple Operating Systems).

Bcdboot can use (or expects actually) a template, to use, if a new BOOTMGR plus BCD store
must be created on a faulty, or new, system partition.
So bcdboot copies the core boot files, related to BOOTMGR, from a chosen existing Windows installation
on some disk, or from remote location (Share), to the system partition, and adds an appropriate
entry in the BCD (and bootmenu).

It can even be as simple as this:

The following will write BOOTMGR plus BCD entries on the current system partition,
using the template from C:\Windows.

C:\> bcdboot C:\Windows

The following will write BOOTMGR plus BCD entries on the E: partition,
using the template from C:\Windows. Note the "/s" switch.

C:/> bcdboot C:\Windows /s E:

The following will write BOOTMGR plus BCD entries on the E: partition,
using the template from C:\Windows. Note the "/s" switch to use another partition,
and note the "/f ALL" switch to include the boot files for support of either a UEFI-based,
or a BIOS emulated machine.

If you are certain what type of system you have, you can also use "/f BIOS", or "/f UEFI".
But on those systems, the defaults will already be set accordingly.

C:/> bcdboot C:\Windows /s E: /f ALL

There are quite a few more switches available, for example "/l" to instruct bcdboot
to implement the specified language like "nl-Nl" or "en-us".

The "sfc" command:

The system file checker (sfc) is a nice utility to check the integrety of system files.
If neccessary, sfc can replace corrupt systemfiles. But it will not check bootfiles.
So here it is about the systemfiles, especially files in %SYSTEMROOT%, like for example
the systemfiles in C:\WINDOWS\System32.

In Appendix 1, you will see a really nice article about sfc, and how to use it.

Chapter 9. Best practices to minimize damage due to RansomWare.

1. A remark on the possible "business model"

Ransomware is not acceptable in modern society. It can create too much damage, business wise, but large individual
grief too.

An important vehikel which the criminals use, is Bitcoin or other cryptocurrency.
Especially Bitcoin, make transactions anonymous, and the receiver of money cannot be (or is difficult) to trace.

Many folks believe, that such system (anonymous receivers), is a BIG motor behind Ransomware.

If it all was just using "traditional" bank accounts, then the Justice department had
at least quite a few pointers to track down the criminals.
But instead, the criminals now have an easy way to collect money, and nobody can see them.

Maybe you don't like such statements, but I think it's quite close to the truth.

It would be great if means would exist, to inspect the "end to end" chain, and ultimatiley
discover the identity of the recipient.
The "end to end" chain can be found, and even cashing stations can be traced, but it is unknown
to me if, on basis of blockchain analysis, purportrators were ever caught.

2. Proactive actions:

We have seen this before, and I repeat it for comfort. Some very trivial "pro-active" measures exists like:

  1. Make frequent backups of datafiles and store the backupmedia offline, and keep e.g. "weekcopies" apart.
    So, also keep some older (but still rather recent) backups. Any SysAdim will tell you that backup/recovery tasks
    are the most prominent duties of System Administration.
    After backups are done, keep the backup devices offline (not connected, or on network).
  2. Do not open unexpected mail attachments. This is most important.
  3. Do not use unexpected/unknown "weblinks", send to you, e.g. by mail.
  4. Use good AV software. There are many brands, but I like MalwareBytes a lot (which says nothing ofcourse).
    AV software that does only a scan once in a while, is not good enough. It must be real-time, intervention software
    that will immediately act if something "smells bad". It will cost some money, but it's neccessary,
  5. Apply Security Patches (and other upgrades) for your OS regularly.
  6. Apply Security Patches (and other upgrades) for your Applications regularly (like Office, Adobe, utilities etc..).
  7. It may appear as a bit of a hassle: You may use several accounts on your PC. Make critical files and folders
    only accessible for the elevated account, using NTFS permissions (access control). If "malware" excutes,
    it often uses the credentials of the current user, (and not the elevated user) and thus protected files and directories
    are not accessible for that malware. Agreed, for a personal user it "seems" a bit like a hassle, but it helps.
  8. Document the disks/partitions for your systems. Simply using output of "bcdedit /enum" and other outputs,
    like from "diskpart" or "mountvol", will tell you which system partitions are around, which may help in case of troubles.
    Or you can use the graphical output from "diskmgmt.msc".
  9. Many tricks are around. For example:
    you can easily mount/dismount Volumes (partitions or disks) using for example the "mountvol" command.
    That way, when the malware strikes, and the volume was not mounted, those files on that volume, are unaffected.
    It seems a bit of a hassle too, for a personal user, but it can be a handy trick.
  10. Optional to consider: It's possible to use a suitable hypervisor, by which you can run a few Virtual Machines on your PC.
    If each uses it's own seperate "datastore", then it might be considered to use one for general Internet Access,
    and another one for serious work. Again, this all is a bit of a hassle, but could be quite effective.
    Those VM's must indeed be fully isolated, so in case of trouble of one VM, it does not affect the other.
    Suppose one gets "sick", it's quite easy to restore a VM backup of that object.
    If some would say "that's bad advice", I would agree to some extend, since implementing it requires
    a bit of additional knowledge. For example: Which hypervisor? How to implement it? Any additional costs? Etc..
  11. This is very trivial (sorry): Do not use unknown devices like usb disks, flash drives and that sort of stuff.

Let's discuss a few of those points.

(5): Vulnerabilites:

Vulnerabilites are most often "globally" labeled with "CVE-XXXX-YYYY", where the XXXX often is the year of discovery,
and the YYYY is another relevant number, like sequence number.
For specific Operating systems, "security patches" might be a bundle of one or more "fixes" for
Vulnerabilites, like for example on Windows, often known under a name like e.g. "KB3048761".

If you want to see some Repositories on the Internet, which archive CVE's and describes them,
you might want to take a look at:

Lists from: www.cvedetails.com
Lists from: cve.mitre.org
National Vulnerability Database: nvd.nist.gov
IT security database: itsecdb.com

That's all nice ofcourse. The bottomline is that you need to apply security related fixes, or hotfixes,
on your Operating System. If you are as lazy as I am, there is a risk of delaying, or posponing
these sort of updates. That's bad practice ofcourse.

(7): NTFS Permissions:

Set NTFS permissions on Data directories, for just selected "groups" or selected user accounts.
Using "explorer", this is not difficult. Go to the properties of some folder, choose permissions,
and remove unneccessary accounts (like "Everyone", "Authenticated Users" etc..), and just create
a listing of accounts which may have {list, read}, or {list, read, write/modify} permissions.

That way, if you use your "simple account" for browsing, and some other stuff, you cannot access the folders/files.
When you want access, logon with the elevated account.

This is a bit of a hassle, and I don not think personal users, will quickly adopt such a "style".
However, it can be quite effective, even against ransomware and other nasty stuff.
Most of this software runs under the credentials of the current user.

A command interface to get the same objective, can be used as well. Say, D:\DATA, is the root folder
for most of your data directories and files. Then you can use commands like:

C:\> icacls "D:\DATA\" /grant MyGirlFriendAccount:(OI)(CI)M /T
C:\> icacls "D:\DATA\" /grant MyElevatedAccount:(OI)(CI)F /T
C:\> icacls "D:\DATA\" /grant MyReadOnlyAccount:(OI)(CI)RX /T

(/T: subdirs too, (OI)(CI): Object/Container Inheritance, F: Full Control, M: Modify, R: Read, W: Write, X: execute/list)

Removing accounts and groups can be done as well. like e.g.:

C:\> icacls "D:\DATA\" /remove users /T

(8): Document your disks and partitions.

In a simple PC / Laptop environment, using Windows, you can get nice output by using
some elementary commands. The listing should be kept in a file "somewhere else", or on paper,
so in case of problems, you at least know what sort of partitions you had.

From an elevated command prompt:

C:\> diskpart
DISKPART> list volume

And use commands like:

C:\> bcdedit /enum

Many more listings are possible, e.g. using "wmic", or "fsutil" etc...
However, the two used above, are pretty neat.

(1): Backups:

This one is trivial.
You can backup to a clouddrive. But make sure you also backup to an external usb disk, or similar.
For a personal user, backing up to a usb disk, or a local NAS (or similar device), is absolutely needed (I think),
if you value your data. Also, have a seperate disk (or device) to "archive" weekly copies,
in order to be quite redundant in data protection.

After a backup procedure, make the device "offline", so contamination cannot occur.

You can make the backup procedure even more stringent (or tight), depending on the amount and value
of your data.

The above are just suggestions. You should follow some sort of a regular procedure, which makes you comfortable
that you cannot loose your data. Keep in mind to have backup devices offline, when you are not using them.
It's a bit trivial to say ofcourse, but "offline", means that contamination cannot occur.

(8): Mount and unmount partitions:

You can "mount" partitions to a mountpoint, (meaning a "drive letter", or "drive:\path"), and unmount it as well.

Unmounted, it's not visible from the usual filemanager tools etc.., and not by malware as well.
It's then not part of listing from drive enummerations etc..

So, you can mount it, and use it (storing and modifying files etc..), and afterwards you can unmount it.

You can use it with an existing formatted partition (as long as there are no handles to it), or with
a newly just partitioned part of a disk. As long as it's formatted (fat, ntfs), you can use it.

Try the mountvol command:

C:\> mountvol

You should see a listing of driveletters and associated GUID's (long strings), representing the volumes.
If a volume is not bound to a drive, you can for example do:

C:\> mountvol H: \\?\Volume{02603480-2372-11e7-a5e7-806e6f6e6921}\

Now you can use H: in the usual way. Unmounting goes by:

C:\> mountvol H: /D

And volume H: is unmounted, and does not exist anymore, until you mount it again.

All in all, it's a simple tool, but can be effective. What's the difference with a external drive?
True, not much.

Well, anyway, I like you to have a good toolset of options of protecting data, in easy ways.

3. A few Free "decryptors" of ransomware, as available from various Manufacturers AV software:

List compiled: 9 Februari 2020.

-There is no guarantee that links will not "fade away" (become inactive), as time moves on.
-Also, might not be the best listing as time moves on.
-The listing was created "by just Googleling around a bit for 15 minutes". That's all there is to it, really.
-Such listings will never be up-to-date, never be complete. But it's good they exist!
-If you are hit by ransomware, report your case to the Police. They may have a cyber unit,
which may help in providing a decryptor.

avast.com
watchpointdata.com
nomoreransom.org
kaspersky.com
heimdalsecurity.com
thewindowsclub.com
trendmicro.com

4. Global Scientific institution for providing free AV software + free keys/tools etc..:

Since malware in general, and ransomware in particular, is such a serious threat, all over the world,
I think that the following would be a reasonable proposal.

Today we have various commercial (and some free) AV providers. They are doing a good job, ofcourse.

I believe that the situation would be better with an International Institute, having top scientists
and top researchers at work, developing globally free AV software plus other utilities (like decryptors etc..).
Ofcourse, they must operate along any line of research. E.g.: they might come up with a hardware based filter
for any outside link, that kills nearly, or even all, malware. It's just an example.

No doubt that such Institution needs some time to get up-and-running. But when fully operational,
I think they will outrun those commercial organizations, with ease.
Their products, however, needs to be free of charge, at all times. That too contributes to success, because
people will implement free tools.

The Authority probably have enough brainpower to analyze blockchains, and whatever needed, using AI
or whatever scientific method, to trace the criminals, and take them out.

It's centrally managed, and will be the hub for all related information in IT security fields.

It's true. Some of this is already partially implemented. But we need it in a "extra forte" scale.
Really big, I mean, so that we can say: Bye bye nasty criminals.

Ofcourse it will cost "some substantial amount". But that's still much, much less compared to the total
damage per year, worldwide.


Appendices.

1. Nice (general) links on how to repair Windows:

How To Repair and Restore Windows 10 (laptopmag.com)
How to repair corruption using sfc and dism commands (howtogeek.com)

2. One of my older textfiles with Win commands (maybe something is still usable):

winshells.txt

3. Keep a low "surface area", or "Attack Surface Reduction"

This note is evidently for private users with PC/Laptop and stuff.

But ofcourse there exists good recommendations to harden your Servers, and your (private)
workstation(s) too. Some recommendations originate from "reckognized Security Organizations".

All in all, those recommendations will benefit a private user too.

They vary from implementing BitLocker, AppLocker, Trusted Boot, and all sorts to advanced configurations,
all the way down to implementing rather mundane settings.

-For example: do you really need all those "services" to boot automatically?
You can check the services by running "services.msc" from the prompt, and take a look
at all running "services". Good chance some may be disabled.
However, I am not saying that it is always easy to discriminate between the services you really need,
and those which may be disabled. It can be a bit of a hassle.

-Some apps start automatically, as configured from the Registry as you might see in
"HKEY_LOCAL_MACHINE\SOFTWARE\Microsoft\Windows\CurrentVersion\Run" and other "Run" keys in other area's.

-You need to have enabled your firewall as well. A good set of rules limiting Apps and open "ports" etc..,
is another example of reducing your "exposed area".

Reducing those items, are a simple form of "Attack Surface Reduction".

It's a good idea to Google on keywords as "hardening" and "windows" and the like.
Just browse through various of those documents.
I am sure you will find some good recommendations.


Those documents are quite similar in options you should enable/disable.


That's it. I consider it done now. Ofcourse, I will add stuff as needed,
and will try to improve it regularly.

Hope you liked it !