Quick introduction SQL Server Integration Services (SSIS) 2005/2008/2012
Version : 0.7
Date : 07/08/2012
By : Albert van der Sel
For who : For anyone who likes to start using SSIS and BIDS.
Level : User Level.
Contents:
1. Introduction.
2. Using the Import Wizard.
3. Introduction SQL Server Business Intelligence Development Studio (BIDS).
4. Ways of executing/scheduling packages.
5. A few notes on Migrating and/or running SQL 2000 DTS packages from SSIS 2008/2012.
1. Introduction.
A very important aspect of "SQL Server Integration Services" (SSIS), is performing "ETL", which is
essentially the import or export of "data" to and from SQL Server databases.
In most cases, SSIS will be used for all sorts of imports, like for example to a Datawarehouse database.
SSIS is especially usefull when heterogeneous sources must be accessed like Oracle, DB2, flat files, Office (Access, Excel) etc..,
and whenever you need to define multiple tasks and descision logic, which you can all build into one SSIS "package".
Ofcourse, SSIS can also be used to transfer tables from one SQL Server database to another SQL Server database.
Sometimes, there are alternatives for SSIS, especially when dealing with flat (ascii) files. For example the "BULK INSERT"
SQL Statement, and the "bcp" command promt utility, are excellent tools for just importing ascii data into SQL Server tables.
However, many import tasks are more complex, in the sense that multiple steps are neccessary, and where descision logic
determines which next steps are neccessary to execute.
And moreover, sometimes you need to "transform" data, in order to make it useable for loading in SQL Server tables.
For example, currency and datetime formats from another type of database, might need to be transformed before these
rows will "fit" into a SQL Server table. Or, maybe the data from some column needs to be split first. It's easy to think
of nummerous other examples.
So, here SSIS can really help in every aspect of Extracting Transforming and Loading (ETL).
A very high level overview on SSIS might be provided by figure 1, which shows the most prominent components.
Fig 1. Birds-eye view on the architecture of SSIS
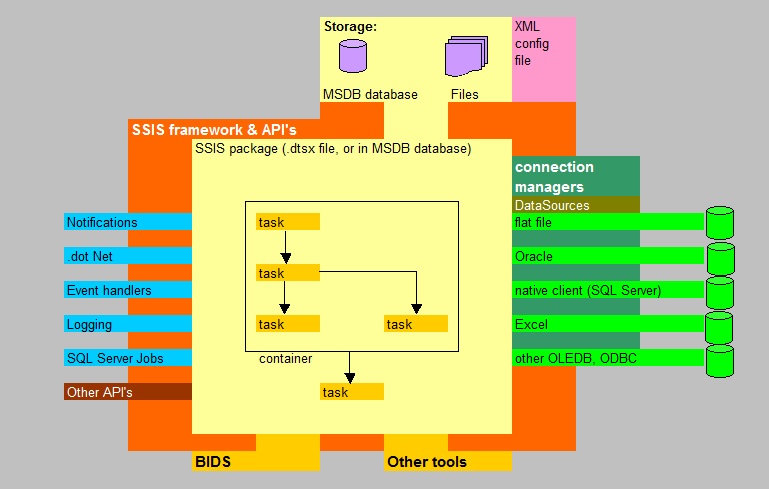
As you can see, there are quite a few components involved. First, SSIS allows you to use a number of "connection managers"
in order to be able to access "external" data like text files, XML files, Oracle Tables, Excel sheets etc..
And, as you compose the package, you typically will add a certain number of tasks, with possible workflow between them.
The way that you can create (and otherwise can interface) to an SSIS package, is through the "Import/Export Wizard, some commandline tools,
and, most importantly, through "SSIS Designer", which is most often referred as "Business Intelligence Development Studio" (BIDS).
These names are actual synonyms to an "Visual Studio" implementation, a graphical development environment, which lets you create SSRS reports,
SSIS packages, and other programmatic "solutions".
Storage of packages can be done in two ways:
- as a file on the filesystem (just a file in some folder),
- or in the MSDB database.
Note:
The package itself is not executable in the sense that for example a true ".exe" is. So, the package content could
just be descriptions in XML, or some other format, which will be "interpreted" by the SSIS runtime environment.
Let's start with the easiest way to make a package: using the import Wizard (which will be described in a very compact way).
No matter how we produce a package, the mere fact that we have one can show interesting info on how it is "stored",
and how we can can import it in BIDS.
As of section 3, we will really start using BIDS.
2. Using the import/export Wizard.
It's easy to perform an import or export to/from (one or more) SQL Server tables, using the "import/export Wizard".
In this note, not all dialogboxes will be shown as figures. Most of the dialogboxes really are quite easy to follow, even if you have
never used the Wizard before.
2.1 Some preliminaries:
- I suggest that you create a folder called "C:\ssistests" (or another foldername of your choice).
In that folder, create the following "tab" delimited textfile:
1 KLM Amsterdam
2 ABCcorp Munchen
3 Akzo Haarlem
- Also, I suppose you have some test/play SQL Server system (2005/2008/2012) with some test database.
In that database (say, called TEST), start a Query Window from Management Studio, and create the following tables:
create table STG_CUSTOMERS -- Staging table
(
cust_id varchar(32) primary key,
cust_name varchar(32),
cust_city varchar(32)
)
create table CUSTOMERS
(
cust_id varchar(32) primary key,
cust_name varchar(32),
cust_city varchar(32)
)
2.2 Performing an import using the Import Wizard:
Note: it might be that this section is.. well.... "boring", if you have used the Import Wizard before.
Anyway, the sole goal here is to get an .dtsx package "fast, and the easy way", using the Wizard.
If this is all old news, then goto section three.
Let's load the (empty) "STG_CUSTOMERS" table, with the data from the "c:\ssistest\customers.txt" file.
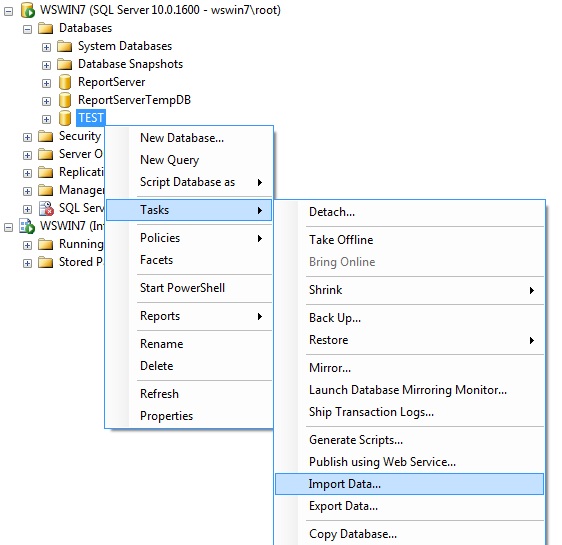
This should be really easy, when using the Import Wizard. To start, rightclick your TEST database, select "Tasks"
and choose "Import Data". This action will call the Import Wizard.
Fig 2. Calling the Import Wizard
If you see the "Welcome screen", the click "Next".
We are not showing all Dialogboxes here. Anyway, in the dialogbox that follows you must choose a "Datasource".
In the selectionlist, choose the "Flat file source". The dialogbox "will adjust iself" according to the
choosen datasource. Next, "browse" to the "c:\ssistest\customers.txt".
Take a good look at all propeties which will appear, like "Format" and "Header rows to skip: 0" etc..
Click Next.
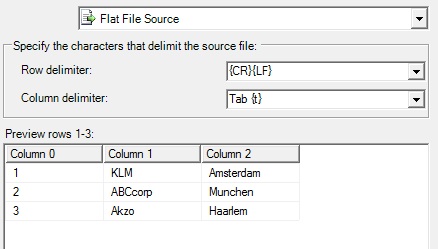
The following dialogbox concentrates on row and column delimiters. Usually Windows textfiles use CR LF (Cariage Return - Line Feed) characters
to goto the next row in the file. And, in our case, the fields are seperated (delimited) by the "Tab" symbol.
Hopefully, this is indeed what the Wizard discovered during the inspection of our textfile, so this is what you should see:
Fig 3. Row and Column delimiters in our text file
Click Next. Following, you must choose a "Destination" for the data of the text file. This must be SQL Server ofcourse,
which usually is named "SQL Server native client". Check the list for all possible "destinations".
Also, make sure your TEST database is selected, and choose an "Authentication Method" (often Windows Authentication)
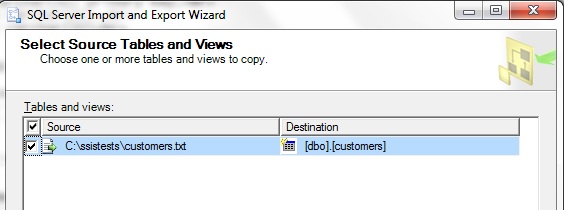
Next, you will see your source "c:\ssistests\customers.txt" in the left pane, while in the right pane,
the Wizard (probably) has choosen the "customers" table to be the destination table.
Check the tablename carefully. I want you to load the data into the STG_CUSTOMERS table, so change the name
if neccessary.
Fig 4. Source and Destination as presented by the Wizard.
After you have changed the destination to be the STG_CUSTOMERS table, click Next.
Fig 5. Save your SSIS package (MSDB or as file)
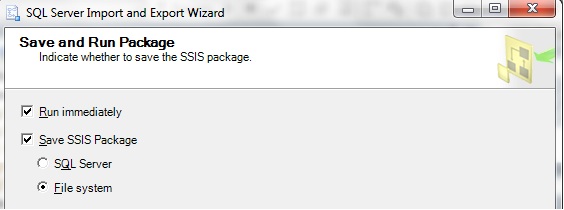
Now you may choose if you want to run the package immediately, and how you want to store your SSIS package,
that is, in the MSDB database, or as a file on the filesystem.
Ok, now select that you want to save to the filesystem (in c:\ssistests).
Fig 6. Saving the package to the filesystem.
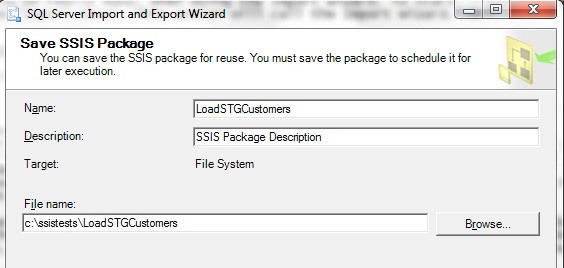
Allright, now save the package as shown in the next dialogbox: as "c:\ssistests\LoadSTGCustomers".
Next, the SSIS package LoadSTGCustomers.dtsx will be saved to "c:\ssistests", and executed.
Hopefully, all went well and 3 rows are imported to the STG_CUSTOMERS table.
Note:
However, things may go wrong quickly. If an error occurred during execution, I hope you will invest some time
to solve it. The main goal is that we have a .dtsx package, that does any work. If you have recieved an error,
you should see some pointers in the output as to what caused it.
->Maybe the STG_CUSTOMERS table was already populated with data from a former trial run, and since it has a primary key, you cannot
load it twice with the same data. An easy way to delete all rows from the table is using the SQL statement "TRUNCATE TABLE STG_CUSTOMERS"
-> Or, maybe the Wizard wants to create the table first, before loading etc.. In this case, you need to disable that by,
working your way through the former doalogboxes.
If you succeeded to create the package, and loading the STG_CUSTOMERS table from the txt file, let's take a further look
at the storage model of the package:
1. Store as a .dtsx file in the File System:
Either use notepad to open "c:\ssistests\LoadSTGCustomers.dtsx", or another editor, or just do what I did, that is,
"type" the contents from the DOS (cmd) prompt:
C:\ssistests> type LoadSTGCustomers.dtsx | more
-- listing of XML code in plain text...
I only want you to note that the contents of the .dtsx package, is just XML (to be interpreted by the SQL Server/SSIS runtime).
2. Store the package in SQL Server (msdb):
If I create a new SSIS package in the same way as before, only this time I save it to "SQL Server",
as shown in the figure below, and save it under the name "LoadSTGCustomers2", then it will be saved as descriptions
in system tables in the MSDB database.
Fig 7. Specifying "SQL Server" (msdb) where the package will be stored.
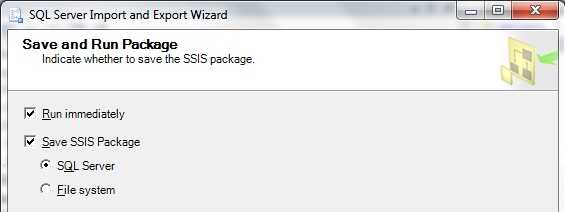
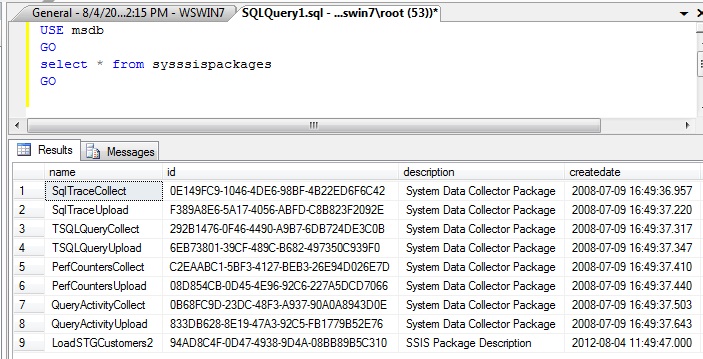
Note that you can query system tables in the MSDB database, just like any user table.
The figure below, shows some content from the "sysssispackages" systemtable.
Fig 8. Query on the "sysssispackages" systemtable in the MSDB database.
3. Introduction SQL Server Business Intelligence Development Studio (BIDS).
From your SQL Server program group, startup "Business Intelligence Development Studio".
Before we start creating packages, we need to get familiar with a few terms.
⇒ A "Project" might function like a container, which may hold one or more SSIS packages (or other items, like SSRS reports).
If you would only create one package, then your project effectively is that one sole package.
So you could easily say: Let's create a Project, to start our ... !
⇒ However, in "Visual Studio like" tools, people often create "solutions", which can be a C# program, a SSIS package etc..
A "solution" might function as a container too. But a solution generally is a wider concept.
It can hold just one Project (e.g. just one package), or even multiple projects.
3.1 Loading the existing "c:\ssistests\LoadSTGCustomers.dtsx" in a New Project
In section 2, we created the "LoadSTGCustomers.dtsx" package, using the Import/Export Wizard.
Let's create a new Project in BIDS, and see how we can "load" or "add" this existing package.
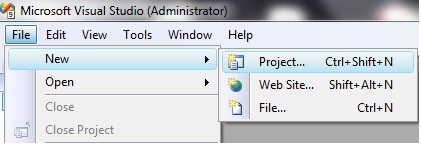
Click "File" -> "New" ->"Project" as shown in figure 9.
Fig 9. New Project.
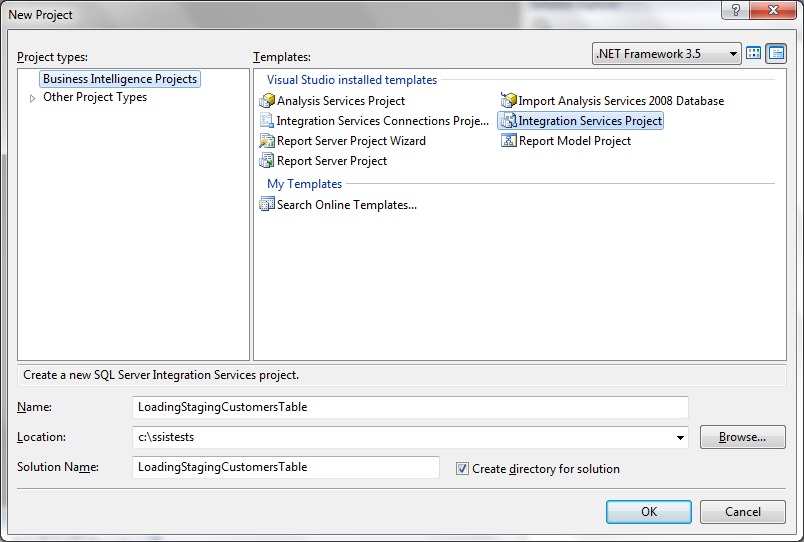
In the Dialogbox which appears, has a left pane, and a right pane. In the left pane you can choose for "Business Intelligence Project".
If that one is selected, then in the right pane, you can choose from serveral templates, like "Report Server Project" and others.
Ofcourse, we will choose for "Integration Service Project". As shown in figure 10, choose the name and location as suggested.
Fig 10. Choosing Integration Service Project, and specify the name and location.
In essence, BIDS rightfully "thinks" that you will start working on a new package. Take good notice of the screen.
On the left there is something you can call a sort of toolbox, with incredably many items.
In the middle there seems to be some sort of "Designer" area. And on the right we see the "Solution Explorer",
where Datasources (how to access data) and Packages (the "mechanics") are shown in a "folder-like" structure.
Note how the "empty" package simply is called "package.dtsx".
Now, let's add our existing "c:\ssistests\LoadSTGCustomers.dtsx" package to our Project.
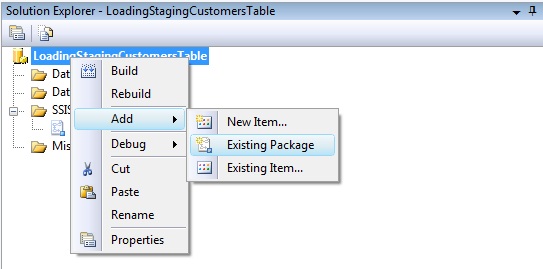
In the Solution Explorer, rightclick the Project (LoadingStagingCustomersTable), choose "Add", and choose "Existing Package".
Fig 11. Adding an existing package (from filesystem, or SQL Server).
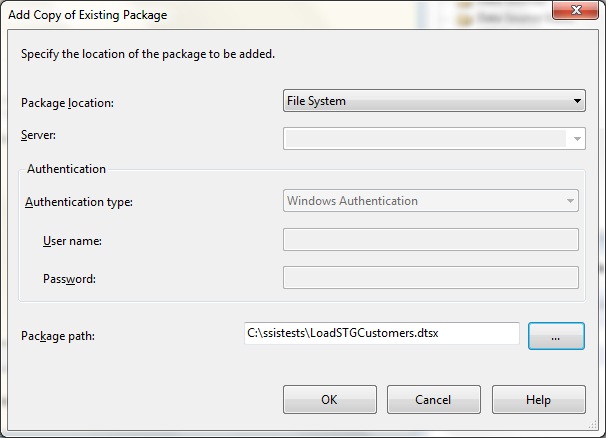
In the following Dialogbox, you can select where the existing package comes from. Since we save the package from section 2,
on the filesystem ("c:\ssistests\LoadSTGCustomers.dtsx"), we choose that, and then we browse to that path.
Fig 12.
When we are done, we see our "LoadSTGCustomers.dtsx" added to our Project. If you want, you can delete "package.dtsx",
or let it just hang there for now.
Fig 13.

Ok, now let's see how we can improve our "LoadSTGCustomers.dtsx" package, using BIDS.
3.2 Designing a Package (adding/modifying "Control Flow" and "Data Flow")
If you doubleclick the "LoadSTGCustomers.dtsx", you will see that the "Designer" area will show the items belonging to this package.
Now, please pay attention to this. First take a good look at the middle of the BIDS screen: the Designer area.
This area has multiple tabs (4 tabs), of which the "Control Flow" and "Data Flow" are the most important ones.
Now, you click from the "Control Flow" and "Data Flow" tabs a couple of times.
In the figure below, I placed those two tabs into one figure:
Fig 14. "Control Flow" tab and "Data Flow" tab, placed in one figure:
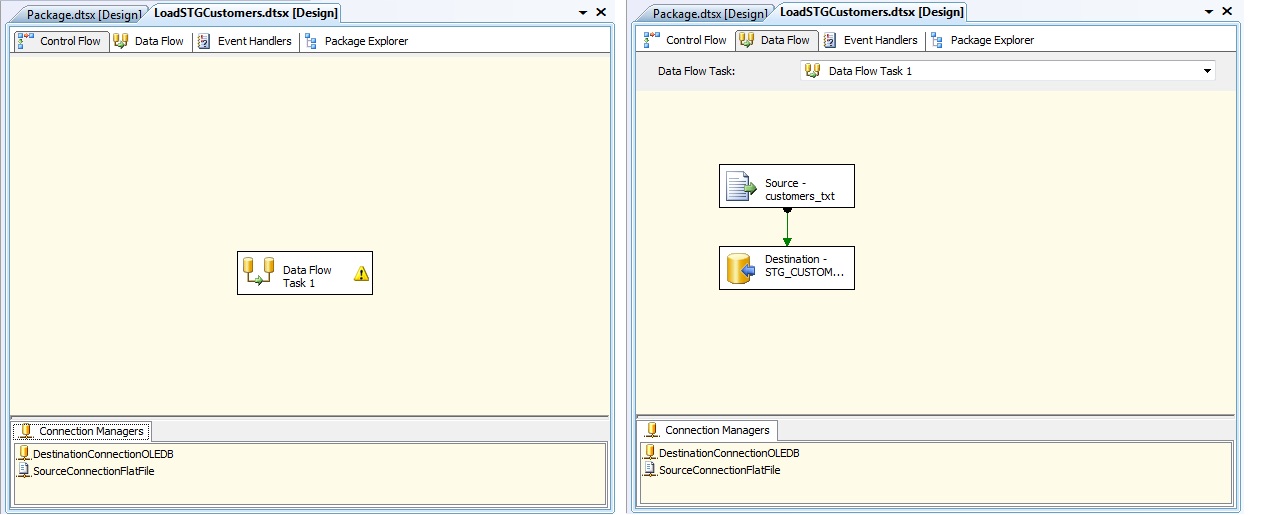
You know that our package just only loads the STG_CUSTOMERS table from the "customers.txt" ascii file.
So, we have just one task!. This is what you can see in the "Control Flow" area.
But, associated with that task, is a "Data Flow" item (from customers.txt to STG_CUSTOMERS), shown in the "Data Flow" tab.
Suppose, that I would have another additional task (as then would be shown in the "Control Flow" tab), with NO Data Flow,
then there was no associated "Data Flow item" in the "Data Flow" tab.
This really is crucial for understanding creating SSIS packages:
If you understand the essential meaning of the "Control Flow" tab, which simply shows you all tasks (with, or not with, Data Flow),
and you understand that the "Data Flow" tab, only shows the "Data Flows" items from those tasks, which indeed are
responsible for Data Flows..... Then.. you got it !!
Above is indeed the essence.
Let's add another task. Since we want to let our package to be repeatable, we need another task which simply
first "truncates" the "STG_CUSTOMERS" table. When that task is finished, we let our other task run (which has a Data Flow).
You know that our STG_CUSTOMERS table has a primary key, so we can't load duplicate rows.
Note:
If the "customers.txt" file, each time that the package would run, would have unique rows compared to former runs,
then we have nothing to worry about. However, since "STG_CUSTOMERS" is just a "staging table", generally, it is often so implemented
that it gets cleared (truncated) each time before a new load happens. It's a sort of common practice.
So, let's add another task that truncates out table first. We know that a SQL statement can truncate the table.
If the "Control Flow" tab, is the current tab, then note how the items in the "toolbox" in the far left of the screen,
will show you all possible "Control Flow Items (tasks)".
Search for the "Execute SQL Task" item, and "drag" it to the "Control Flow" tab. Your screen might now resemble this:
Fig 15. Adding a "Execute SQL Task" to the "Control Flow" area:
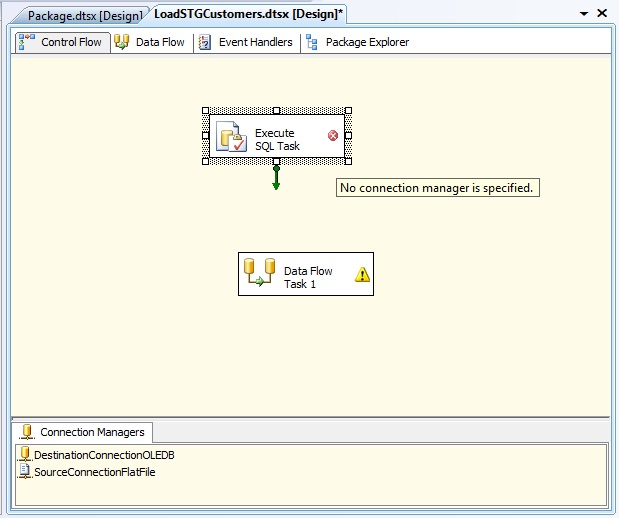
Ok, we have added the task, but now we need to tell it what is should do, and on which "connection". About the latter, have you
noticed that Figure 14 also shows our "connection managers"? Since we are dealing with a source file which is a flat (ascii) file,
one connection manager was named by the Import Wizard as "SourceConnectionFlatFile", which is not a bad naming at all.
The other connection, to the SQL Server TEST database, was named by the Import Wizard as "DestinationConnectionOLEDB".
Telling the new task "Execute SQL Task", what is must do, and where (on which connection), is not difficult.
Just rightclick "the border" of the "Execute SQL Task" and choose "Properties". Or just doublick those "borders".
Fig 16. Using the "Properties" to set the specifics of this Task:
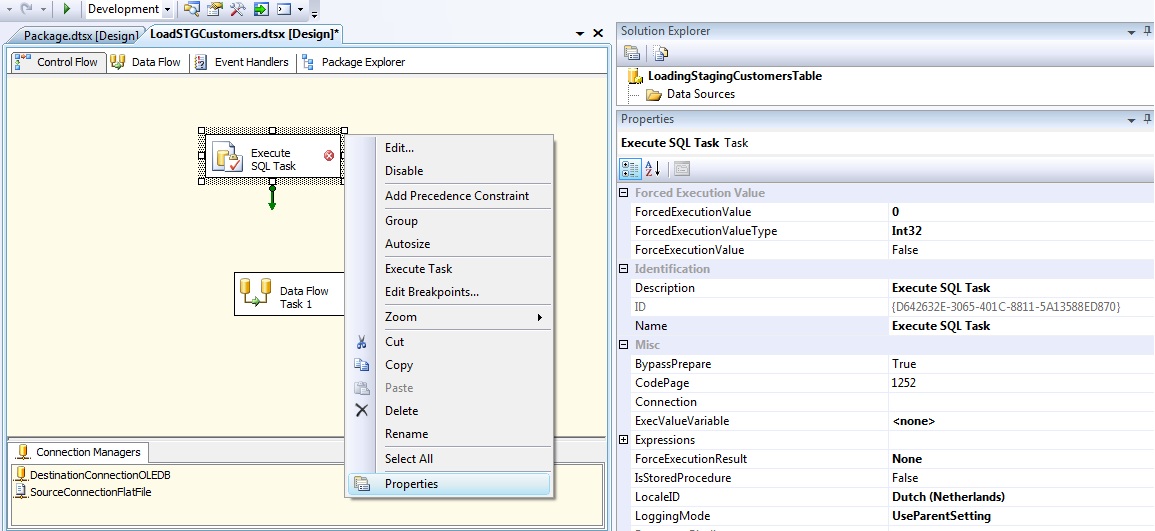
In figure 17, I just doubleclicked the border of the task, which I find easier to view the properties in a better format.
Now I am able to set the connection manager ("DestinationConnectionOLEDB" to SQL Server TEST database), and to type in
the SQL Statement, and to rename the task to a more fitting name (Truncate STG_CUSTOMERS).
Fig 17. Modifying the "Properties" of this Task (via doubleclicking border):
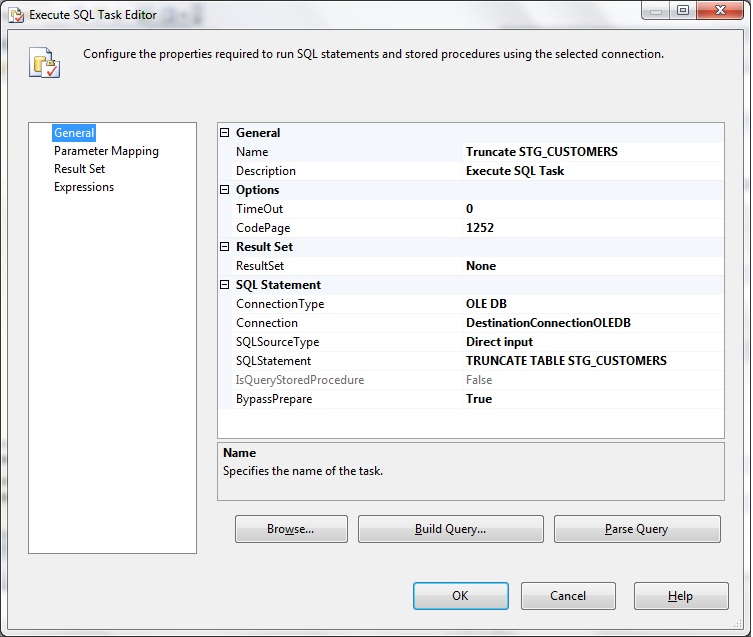
As you can see from figure 17, I was able to type in all desired properties. Note there is also a left pane where you
can set many more properties. But for our purpose, were done for now.
Now, as a last step, from the "Control Flow" tab, stretch the "green arrow" from the "Truncate STG_CUSTOMERS" task, to
the task we already had (I forgot to rename that one to a more appropriate name).
The result should resemble to what you see in figure 18.
Fig 18. Creating Control Flow of Tasks:
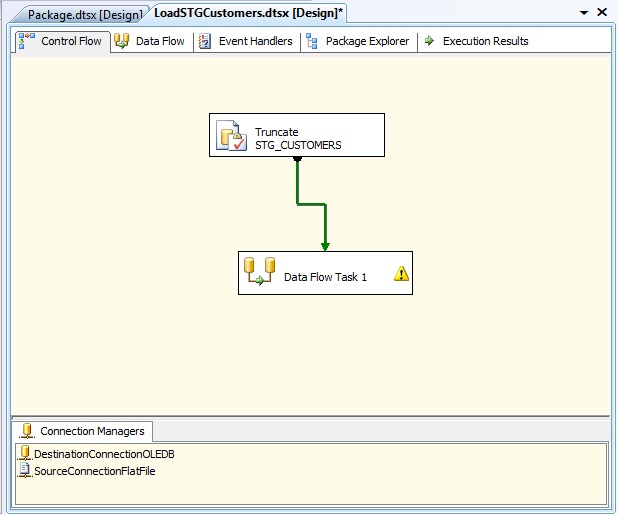
Nice huh? Now, rightclick "Truncate STG_CUSTOMERS" and choose "Execute Task". Then, the Task will be executed,
and if all went OK, the Task will be coloured green. This way, you can test all your (sub) Tasks.
Note that when you test Tasks, you will be in a sort of "debugging mode", which you can escape out by
choosing "Debug" -> "End Debugging" from the Main Menu of BIDS. This way, you will go back to the normal edit mode again.
So, here we really have a working project.
Take a look again at the "Control Flow Items" on the far left of BIDS.
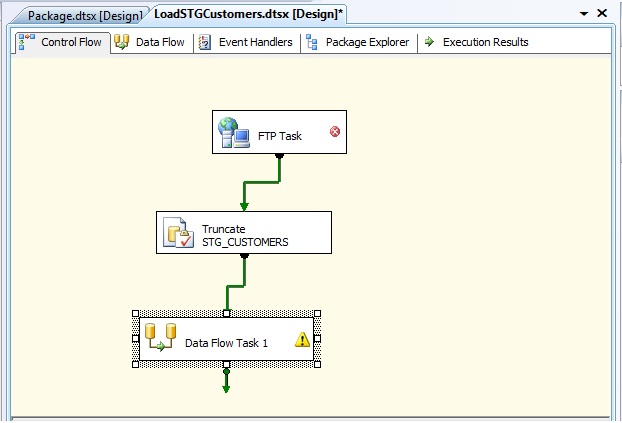
As an example, you probably can imagine that we could start our Project with "FTP-ing" the "customers.txt" file from some FTP site.
True, it is a bit hypothetical, since I would not recommend any FTP action from a Package, but that is not the point.
The point is, that we are able to add another task, like a FTP task, as the first step/task in our Project.
For that matter: you can place any appropriate Task to the Designer area, as the first-, the last-, or intermediate Task.
Fig 19. It's Just an example: Add a "FTP Task" to retrieve the customers.txt file:
Excercise:
"Drag" the "FTP Task" to the Designer area ("Control Flow" tab). Get to the properties of this task, and explore
how you can set the "authentication", how to rename the task to a meaningfull way, and set the path, and get- or put method.
Tremendously much more can be said ofcourse, in developing SSIS packages. A large Project will undoubtly use many different tasks.
In reality, you might encounter many small and/or large projects.
But, "by doing it" is truly the best way to grow into SSIS/BIDS.
I think, that if you were really quite new on SSIS/BIDS, this note should have helped somewhat,
in exploring this massive environment.
4. Methods of executing and scheduling SSIS Packages.
There are many ways to execute and schedule a SSIS package. This section will just list a few important ones,
but like everything else in this simple note, it does not claim to be "complete".
When running packages, or schedule a package to run once or periodically (on a certain date/time),
a variety of errors may occur. However, many errors have "to do" with security issues or lack of permissions.
For example, when you manually run a package, it might run correctly, but if you have scheduled it, it might fail.
In many cases, it's a security issue.
Always be aware that the account which is used to run the package from a schedule, might be the cause of the issue.
In case of problems, always also check the Windows eventlogs (eventvwr) and the SQL Server errorlog.
They often provide good pointers as to why a package (or task within a package) have failed.
4.1 The "dtexecui.exe" utility.
This is a graphical interface that enables you to execute (but not schedule) any SSIS package.
Here the package maybe stored on the filesystem, or in SQL Server.
Fig 20. Using the "dtexecui.exe" utility:
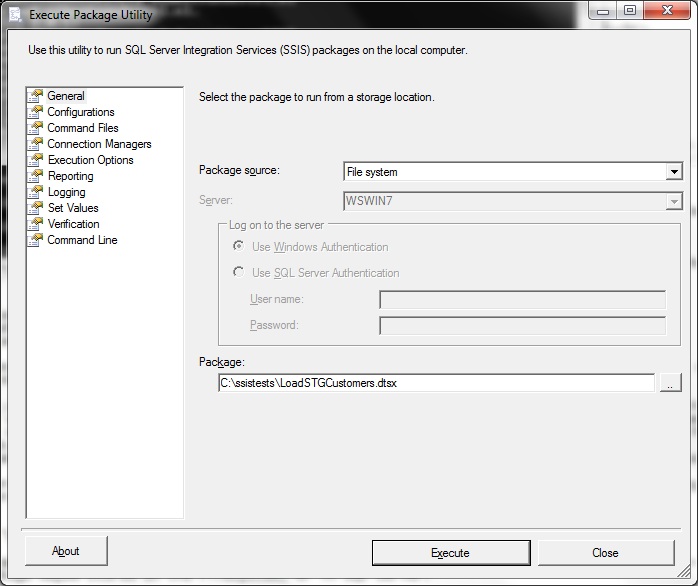
Note that you first must choose the "package source". This can be a .dtsx file on the file system,
or a package in SQL Server (or a package in the socalled "package store").
In figure 20 shown above, I choose our familiar package "c:\ssistests\LoadSTGCustomers.dtsx" (from the filesystem).
Also note from figure 20, that in the left pane, many advanced configurations are possible."command line", you will see
the default "call" (using "dtexec") to start that package:
dtexec /FILE "C:\ssistests\LoadSTGCustomers.dtsx" /CHECKPOINTING OFF /REPORTING EW
However, if you would change the options under "Reporting" (for example "add" additional reporting), and then again
change back to "command line", you would probably see that some switches were added to the command line.
4.2 The "dtexec.exe" commandline utility.
Actually, the graphical "dtexecui.exe" utility (see 4.1), is a Userinterface to the plane "dtexec.exe" commandline utility.
You can use "dtexec.exe" to start a package from the "C:\>" commandline.
Note that you most certainly can schedule "dtexec" commands, for example by placing the dtexec command in a .cmd
batch file, and schedule this batchfile using (for example) the Windows scheduler.
In it's most simplistic form, you could start the package using only the /F(ILE) switch, which tells "dtexec" the location
and name of the filesystem based .dtsx package, like:
C:\> dtexec /F "C:\ssistests\LoadSTGCustomers.dtsx"
Use "dtexec /?" to view all commandline options.
4.3 SQL Server Agent job.
An easy way to add a scheduled SQL Server Agent job, is using the "SQL Server Management Studio" (SSMS).
For this to work, the "SQL Server Agent" must be running, which is easy to check from SSMS.
Fig 21. Adding a Job to the SQL Server Agent:
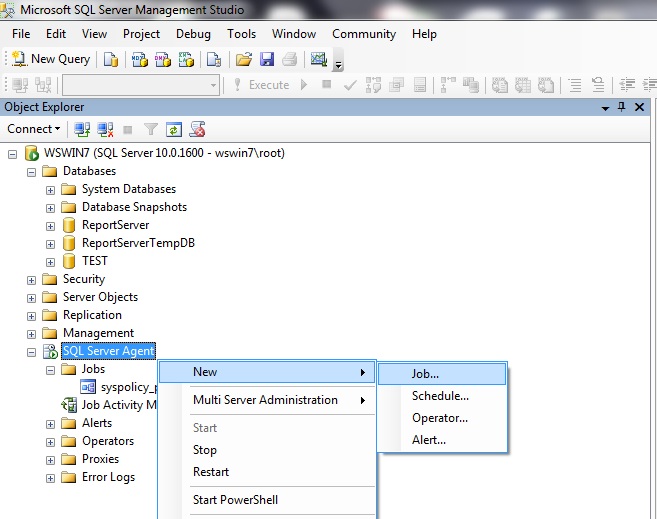
Rightclick the SQL Server Agent, choose "New", then choose "New Job".
From the Dialogboxes that follows, you can add one or more Job "steps", and a "schedule" for this new Job.
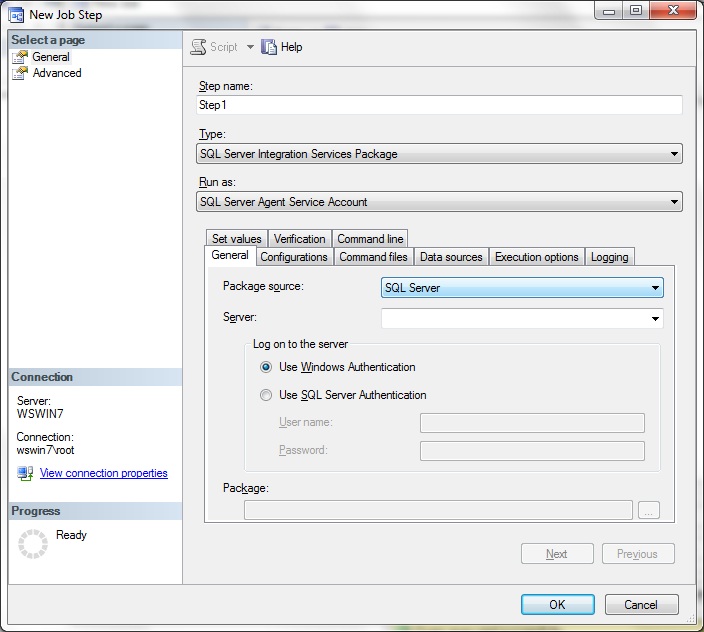
When choosing your Job "Step", you see a Dialogbox as shown in figure 22. Give the "step" a name (like e.g. step1),
and take special notion of the "Type" field, from which you can choose the type of step, like TSQL code,
or CmdExec (Operating System command), Powershell script, and some other types, and a "SQL Server Integration Services Package" too.
When choosing the latter, you can select the package source (like filesystem, SQL Server).
Fig 22. Adding a SSIS Job Step:
5. A few words on Migrating and/or running SQL 2000 DTS packages from SSIS 2005/2008/2012.
This section can only be of interest, if you still have SQL Server 2000 DTS packages in production, and you need to run, or migrate,
them to SQL Server 2005/2008/2012.
5.1 Some general considerations:
Although SSIS 2005/2008/2012, have quite a few differences among them, the overall architecture still is very similar.
However, comparing SSIS (as of 2005) and DTS of SQL Server 2000, you can only say that the differences are enormous.
SSIS is a completely new product and not a version upgrade from DTS (Data Transformation Services).
DTS of SQL 2000 (and SQL7) uses a complete different architecture.
⇒ For example, in SSIS, the processing of a package uses a completely different memory model (all for the better),
if you compare that to DTS.
⇒ As another example, you know from Section 2, that SSIS packages are XML files to be interpreted by SQLServer/SSIS runtime engine.
You could even "type" a (filesystem based) package file from the prompt, to view the contents.
DTS packages are not XML, and their internal storage is completely different.
Now, surely almost everybody has forgotten about DTS, except the few DBA's who still have antique SQL Server 2000 systems,
where DTS packages are still in use.
You might immediately ask: why weren't those systems migrated to SQL2008 long ago?
In real life, many answers exists. For example, the DBA's were not the owners at that period, or the company merged
with another organisation which brought along those SQL2000 systems, as a nasty surprise.
Or, because of "island automation" where some department first did not fall under DBA/admin support, but now they suddenly do. Etc.. etc..
Whatever the reason, some folks still have DTS packages which must go to (for example SQL2008).
In priciple, there are three paths you could follow:
- Upgrade SQL 2000 (DTS included) to (preferably) SQL Server 2008 R2 (or higher), then use the "DTS package Migration Wizard".
- On SQL 2005/2008, and if you have the DTS packages too, then use the "DTS package Migration Wizard".
- Run 2000 DTS packages from SSIS/SQL Server 2008 R2 (or higher) using the "DTS Runtime engine"
⇒ The "DTS package Migration Wizard" migrates DTS packages to SSIS packages.
⇒ The "DTS Runtime engine" makes it possible to run the older DTS packages from SSIS.
Note:
However, with a SQL Server 2000 upgrade , we should not be surprised if SQL Server 2000 then even runs on a Win2000 System too.
If you think about that, at least two possible reasons could exist why "the whole system" is so old:
- The original owner never cared to upgrade. If so, in such a mindset, then it's a real possibility that "everything else"
is quite "messy" too (like old hardware ready to "implode", ill designed databases, all sorts of weird dependencies etc..).
- The DTS packages are so specific and/or complex, that an upgrade simply was not feasable, or too much of an effort.
Anyway, both scenario's are quite unpleasant, if the DTS packages are still significant for the organisation.
In a nutshell: You can upgrade a SQL 2000 system directly to SQL 2008 R2.
The upgrade does not install run-time support for DTS packages, but it does install the "DTS Package Migration Wizard"
which can assist you to migrate DTS packages to the native SSIS format.
This leaves you with the original DTS packages (which you cannot run without the features as discussed in section 5.3), and the migrated versions
in SSIS format.
Especially the fourth link below, explains the general steps in migrating DTS packages to SSIS. The succes of migrating simple DTS packages
might be high, but for complicated packages (or packages using some ActiveX scripts, or using features like .udl etc..), you might be dissapointed.
The same link also discusses the use of the "DTS xChange Package Migration" utility from "Pragmatic Works", which
does a better job in migrating complex DTS packages. It's not a free suite, but a demo version is available. See also link 5 below.
Would you consider an upgrade, the following articles might be of use:
(1) (MSDN) Considerations for Upgrading Data Transformation Services
(2) (MSDN) Support for SQL Server 2000 DTS in SQL Server 2008 R2
(3) (MSDN) How to: Install Support for Data Transformation Services Packages
(4) (MSDN) Migrating DTS Packages to Integration Services
(5) (pragmaticworks.com) DTS xChange - Product Overview
(6) (download centre MS) Microsoft SQL Server 2008 Feature Pack, April 2009
5.2 Using the DTS package Migration Wizard:
Even if you would not have done an upgrade, but you would have a SQL Server 2005/2008 installation, with databases where
the DTS 2000 packages might act upon, you still might benefit from the "DTS package Migration Wizard".
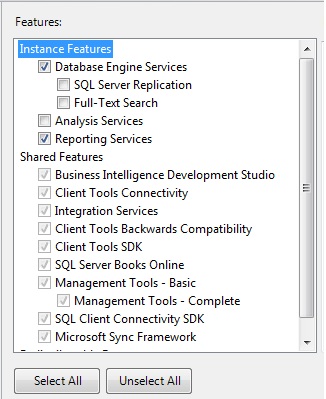
You should have the Wizard on your system, if you installed SQL Server with SSIS and a "shared feature" called "Client tools Backward Compatibility"
Fig 23. Installing SSIS with other shared features:
But you still need the "DTS runtime engine" in order to use the Migration Wizard, so that might be a bit confusing.
So, you do not have another option (to my knowledge) than to download and install the runtime first.
See link 6 above, on how to obtain the runtime for SQL 2005/2008.
It's obvious that you are not eager to install the runtime on production machines, so it's quite obvious to
perform migrations in a Test environment, and once having SSIS packages (and tests are succesfull), to consider to transport them to
acceptance and production.
So, to recap: In order to use the "DTS package Migration Wizard" succesfully, you need:
- SQL Server 2005/2008 (or later) with SSIS and the "Client tools Backward Compatibility" shared feature.
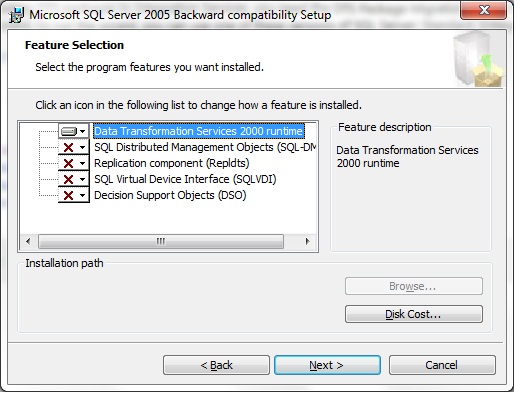
- The "DTS runtime engine", which is installed seperately. To download it for SQL2005/2008: see link 6 above.
Fig 24. Installing the DTS 2000 runtime:
To start the wizard, go to the prompt and try:
C:\> DTSMigrationWizard.exe
If it's not found, then try to look for it in a path like for example "C:\Program Files (x86)\Microsoft SQL Server\100\DTS\Binn"
Let's try a simple migration:
Suppose on a former SQL 2000 Instance, in database test, I had a CONTACTS table which got loaded from a "c:\dtstests\contacts.txt" file, using
a DTS package.
The layout of the table and file are as follows:
create table CONTACTS
(
contact_id varchar(32) primary key,
contact_name varchar(32),
contact_city varchar(32)
)
1 Albert Amsterdam
2 Betty Washington
3 Miranda Teheran
Ofcourse, my example again is the mosts simplest of the simplest, but it should give an idea on how to proceed.
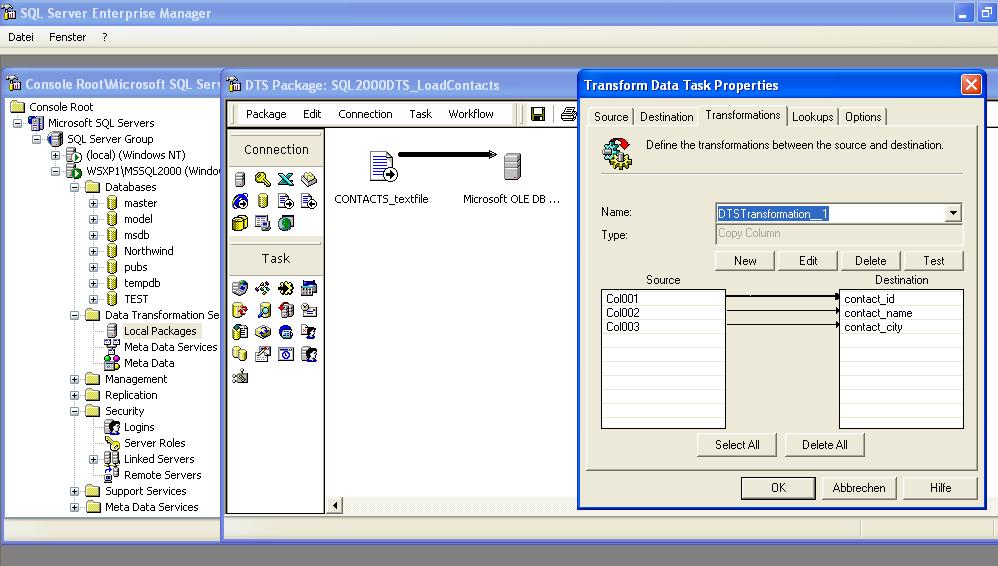
So, a long time ago, on the SQL2000 instance, someone created the DTS packages of which figure 25 might give you an impression:
Fig 25. Creating a DTS package in SQL 2000:
Now, suppose we have this DTS 2000 package, the .txt file, and the CONTACTS table in (for example) in a SQL Server 2008 database.
In this case, we can try to migrate the DTS package to SSIS.
Start the Wizard again. On the "Welcome/starting screen", click "Next".
The next dialogbox, let's you choose between a DTS package stored in SQL Server (2000 msdb database), or whether it is
a ".dts" file stored on the filesystem.
Fig 26. Choosing the DTS source (in SQL Server msdb, or as file in the filesystem):
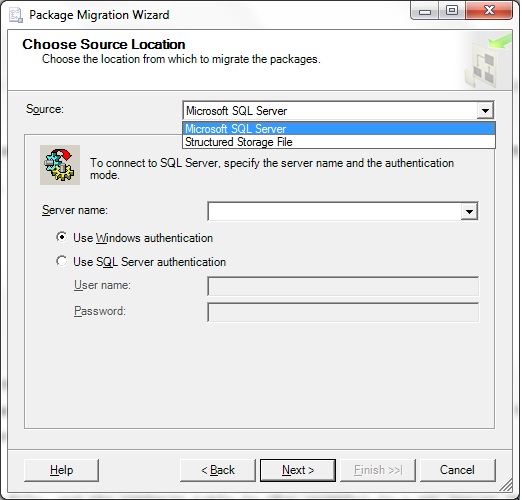
Since I have the DTS packages stored as files, I choose the "Structured Storage File" option. The next dialogbox
enables me to browse to the DTS package file (not shown in a figure).
After that, you must choose a destination which can be a (2008) SSIS .dtsx file, or storage within your 2008 Server,
if SQL Server 2008 was indeed the target system.
Fig 27. Choosing the Destination (in SQL Server, or as .dtsx file in the filesystem):
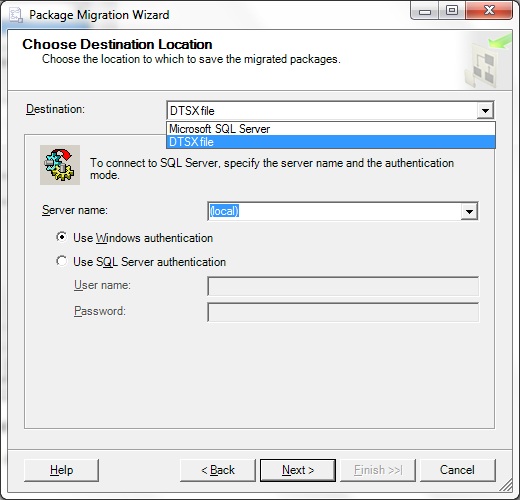
Next, the Wizard shows you the DTS package(s) that's about to be migrated (although the original DTS file will be preserved).
Next, you must choose a logfile where the Wizard will register the status of the migration.
Ok, now it's starts the migration to a SSIS .dtsx package. In this case, the migration was successfull, but that
was to be expected due to the simplicity of this example.
5.3 Using the "DTS 2000 Runtime Support" for 2005/2008:
See link 6 above, on how to obtain the "DTS 2000 Runtime Support" for 2005/2008.
On that page, look for the "Microsoft SQL Server 2005 Backward Compatibility Components".
According to your hardware (x86, x64, or IA64), choose one from the following packages:
X86 Package (SQLServer2005_BC.msi)
X64 Package (SQLServer2005_BC_x64.msi)
IA64 Package (SQLServer2005_BC_ia64.msi)
Although the installers carry "2005" in their names, the add-on product is for both 2005 and 2008.
Maybe you are bit reluctant to install on a production machine, but:
- It's a regular and official Microsoft product.
- When installed, it's a DTS runtime environment, seperate from SSIS.
The setup of the addon is very simple. Best is to only choose the "Data Transformation Services 2000 runtime". See also figure 24.
Even on a 64 bit machine, the runtime will only support running DTS packages in 32 bit mode.
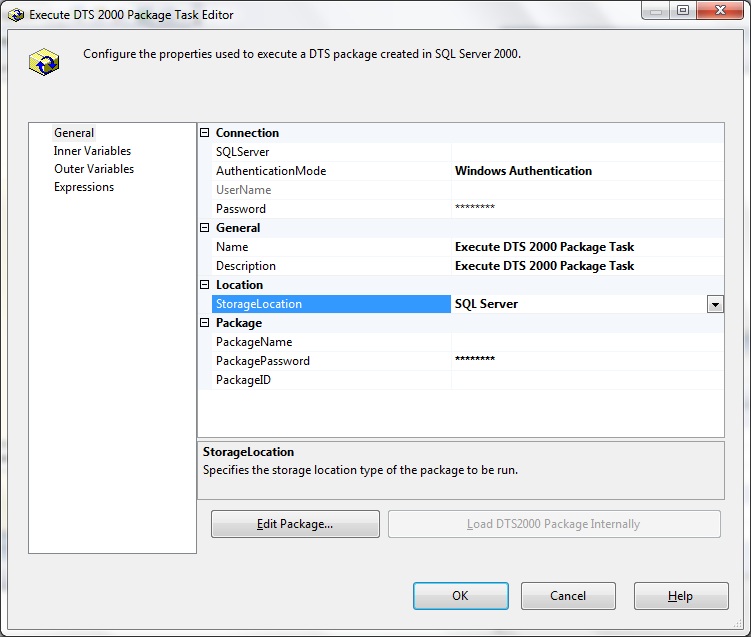
The usage is very simple. In BIDS, create a new SSIS project. In the left of BIDS, you see the toolbox.
Simply select the "Execute DTS 2000 Package Task", and drag it to the Designer area.
Then doubleclick the border to open the properties. Here you can simply set the properties as needed,
like for example the "StorageLocation". That is all there is to it.
You can save it as an SSIS package now.
Fig 28. Modifying the propeties of a "Execute DTS 2000 Package Task":
That's it. Hopefully it was usefull.....


