A "Super Simple" Unix "LVM" description.
Date : 20/05/2013
Version: 0.0
By : Albert van der Sel
Level : Entry Level
Remarks: A simple description on "Logical Volume Management" on a few well-known Unix systems. Hopefully, it's any good.
Let's review some highlights on "Logical Volume Management" (LVM) on a few important unix systems.
Here, we take AIX, HPUX, and Linux (as some generic distro) as example Operating Systems.
For other systems, the general approach is quite the same, but ofcourse specific commands and methods
will vary.
Important:
A few commands will also be discussed which will retrieve or show some "critical" area's of disks,
which contain LVM "metadata". Don't run those commands "just like that", but only after reading and understanding
the text which discusses those commands.
1. A note on "Device Files" or "Device Special Files":
1.1 Traditional (non-persistent) device files:
This section is not focussed on AIX or HPUX. Just suppose that in this section, we have "some" "general" Unix in consideration.
Although such a "generic" Unix does not exist, we just assume there is one, and we take it from there.
Don't worry, immediately after section 1.1 we return to real stuff like AIX, HPUX and Linux.
Now, let's see how in general the socalled "device files" are organized. These device files play a role in how the system
accesses devices like disks, ports, terminals, CD's etc..
In Unix systems too, disks are accessed by drivers. These drivers are loaded in the kernel.
A sort of "entry point" (or interface) to the drivers and supporting software,are defined by the "device special files"
which you can find in directories like "/dev", or in "/dev/dsk" and "/dev/rdsk".
These are indeed files alright, but not like the regular files you would find in any other directory, like the normal binaries, text files, scripts etc..
Here, they "act" like pointers to where the driver code can be found in the kernel.
Traditionally, if you would take a look in such a directory, you might see such "files" listed as in the following example:
starboss:/dev/dsk # ls -al
brw-rw-rw- ..2 root...system.....10, 48 Sep 15 16:13...c3t2d0
brw-rw-rw- ..2 root...system.....10, 64 Sep 15 16:13...c3t2d1
brw-rw-rw- ..2 root...system.....10, 52 Sep 15 16:13...c2t1d0
..
etc
Note the numbers as "10,48" in the listing above. Traditionally, these are called the major and minor numbers, representing
the address of the driver which is bound to a particular disksystem.
So, we might have as a device file, the object:
/dev/dsk/c3t2d0
Unfortunately, such a device file has actually an "encoded" hardware path. You can tell that from the "c3t2d0" stuff.
It actually means that we talk of that disk, which can be found following the third "card instance" (c3), then from that card,
we follow the bus to "target" 2 (t2), and finally we can find the disk or LUN which carries the number "0" (d0).
Even if you would only be slightly familiar with SCSI, you should reckognize such addressing.
As another example "/dev/dsk/c0t6d0" would mean that we can find disk "d0", under target 6 (t6), on the very first Host adaptercard (c0).
Although such addressing was in use for many years now, and it still is for many Unixes, there are a few disadvantages.
Suppose you needed to change a disk to another card. Then obviously, the original device file is not up to date anymore.
However, the system would create a new device file (at the next boot, or using a renewed scan of the bus).
But, often filesystems are automounted using a configfile like "/etc/fstab" (or another file), and you needed to update that one.
That's why such device files are also called "non-persistent" (or non-agile).
Look again at the listing above of the "/dev/dsk" directory. If you would now go to the "/dev/rdsk" directory, you would see a similar listing.
However, the noticable change from the two listings is that the "b" in "brw-rw-rw-", would be changed into "c" in the "/dev/rdsk" listing.
This is so because Unix uses "block" device files in "/dev/dsk" and "character" (raw) device files in "/dev/rdsk", for specific purposes.
Why is that?
Historically, some devices as terminals use a form of communication where characters are exchanged one by one. Other devices
use the regular memory buffers, where "blocks" of data are stored. So, say for a terminal, a "c" device file seems to be most appropriate.
Likewise, for a disk a "b" device file seems to be the best one. However, for many sorts of devices, both types of device files were created,
and, depending on what you want to do with the device, you should then select the correct type of device file.
So, specifically for disklike devices, if you want to realise "data transfer" or setup the system so that "data transfer" gets possible, then use the block devices.
However, if you want to format the disk, or "perform" administrative tasks, then you should use the character device file.
Remember that we are still considering a "generic" Unix here (not specifically focusing on HPUX or AIX).
So the next command examples do not neccessarily have to apply to HPUX or AIX.
Here is an example on how you would use the "block" or "character" device files for a disk.
Suppose you have a new disk, and you want to use it for a filesystem. In such a case, you typically would do this:
# mkfs -F vxfs /dev/rdsk/c0t6d0 12288
Then, once that filesystem was placed on the new disk, you would mount it, using some mount directory, in order to make it accessible
for users and applications.
# mount /dev/dsk/c0t6d0 /data/oracle
Don't take the above commands too literary. Both in AIX and HPUX, you would most often use socalled "Logical Volumes"
for creating filesystems and mount commands. More on that later.
Note that with the mount command, we use the "block" device, since we now want the system to use faster memory buffers.
So, once it's mounted, data IO uses "blocks" of data, meaning larger chuncks going to and from memory buffers.
1.2 Modern persistent device files:
Although we did "as if" we were talking about some "generic" Unix in section 1.1, device files like we discussed above might
actually be seen in many Unixes. However, modern Unix variants, preferably uses "persistent" device files.
For example, HPUX 11i Rel 3, uses those. If you see the naming of the new persistent files you immediately see that the "cXtYdZ" stuff is not used anymore,
so the device file is not tied to the physical hardware path to a disk, like the Controller instance, target number, and LUN number.
In most cases, now the actual device (the true disk, or a LUN) is identified by it's WWID, or "World Wide Identifier".
Here are a few HPUX 11i Rel 3 examples:
/dev/disk/disk22
/dev/rdisk/disk22
Above you see the "device files" for disk "disk22". Note however, that still a block device (in /dev/disk), and a
character device file (in /dev/rdisk) are still both present. The usage of such files remains the same as discussed in section 1.1.
1.3 Disk device files on HPUX, AIX, and Linux:
Linux:
In a few occasions, you might see device files in Linux distro's, for example, for a local disk cabinet, as listed in the following example:
/dev/cciss/c0d0 .... Controller 0, disk 0, whole device
/dev/cciss/c0d0p1 .. Controller 0, disk 0, partition 1
/dev/cciss/c0d0p2 .. Controller 0, disk 0, partition 2
/dev/cciss/c1d1 .... Controller 1, disk 1, whole device
/dev/cciss/c1d1p1 .. Controller 1, disk 1, partition 1
etc..
But more often you will see the "native" disk device files as:
/dev/sda...- first SCSI disk (address-wise)
/dev/sdb...- second SCSI disk (address-wise)
/dev/hda...- master disk on IDE primary controller
/dev/hdb...- slave disk on IDE primary controller
etc..
While "partitions" on those disks (or LUNs) are referred to as for example:
/dev/sda1...- first partition on disk sda
/dev/sdb1...- first partition on disk sdb
etc..
So, if we would take a look in "/dev", we might see device files like:
# ls -l /dev/sd*
brw-rw---- 1 root disk 8, 0 Aug 17 18:05 /dev/sda
brw-rw---- 1 root disk 8, 1 Aug 17 18:05 /dev/sda1
brw-rw---- 1 root disk 8, 10 Aug 17 18:05 /dev/sda2
brw-rw---- 1 root disk 8, 11 Aug 17 18:05 /dev/sdb
brw-rw---- 1 root disk 8, 12 Aug 17 18:05 /dev/sdb1
etc..
Note that Linux too use "block device files" for disks and disk partitions, and possibly character device files for other devices.
However, for actions on disks, we only have to consider block devices at all times.
HPUX:
For any version before HPUX 11i Rel 3, the nonpersistent device files were in use, like for example:
/dev/dsk/c0t6d0
/dev/rdsk/c0t6d0
And for later versions, a preference exist to use the newer "agile" files, like for example:
/dev/disk/disk7
/dev/rdisk/disk7
We already have discussed this in section 1.1.
Please note that you can still use the "older" cXtYdZ device files, in the very latest HPUX version.
AIX:
Although it's a fabulous type of Unix, it comes from IBM and thus it has it's very own specific "character" so to speak.
You will not see any "difference" from other Unixes, by using a shell alone, like ksh, or bourne or bash etc..
But the "harder" Sysadmin commands (of which there are incredable many) have their own IBM "touch".
Anyway, how disk device files look like, is the subject of this section.
Both HPUX (later releases) and AIX, natively already uses socalled "Volume Groups" (see chapter 2), and the place where
the Operating System "lives" is "rootvg" (AIX) or "vg00" (HPUX).
So, for example, the well-known filesystems like "/", "/var", "/opt" etcetera, all sits in "rootvg" (AIX) or "vg00" (HPUX).
Now, a Volume Group like "rootvg", just is a sort of pool of one or more physical disks or LUNs.
For AIX, disks are called "Phyiscal Volumes", with a name like "hdiskN" (N=0,1,2,3 etc..), and those device files live in "/dev".
Here is how it "looks" like.
Let's do a simple "ls -al" in "/dev":
brw------- 1 root system 16, 10 May 27 17:44 hdisk0
brw------- 1 root system 16, 12 May 27 17:44 hdisk1
brw------- 1 root system 16, 14 May 27 17:44 hdisk2
brw------- 1 root system 16, 16 May 27 17:44 hdisk3
crw------- 2 root system 16, 18 May 27 17:44 rhdisk0
crw------- 2 root system 16, 22 May 27 17:44 rhdisk1
etc..
So, the block device files are "hdisk[N]" and the character device files are "rhdisk[N]".
What is quite special about AIX disk device files, that almost all actions you would do, only would involve the block device files
like for example "hdisk0".
2. A Quick Introduction to "LVM":
Chapter 2 will be a "fast" orientation on Volume Groups and Logical Volumes, and how to create them using the commandline.
However, in chapter 3, we will go into some more detail on those subjects.
From now on, most of the time, we're going to use specific "LVM commands" to show, create, and manage LVM objects.
Let's go to the concept of a "Volume Group" (VG) first.
Imagine you have a machine with an OS disk, already taken by the OS, and three free internal disks.
Now, you could format each of these three disks, and use them independently for "filesystems".
Everything "changes" if you would use an LVM, and if you would create a Volume Group, using those free disks.
So, for example, say, in our imagination, the machine was using either AIX, or HPUX.
- On AIX...: Suppose we have the free Physical Volumes hdisk3, hdisk4, hdisk5.
- On HPUX..: Suppose we have the free Physical Volumes disk10, disk11, disk12.
Then we could try the following:
=> Creating a Volume Group:
- On AIX:
# mkvg -y appsvg -s 64 hdisk3 hdisk4 hdisk5
- On HPUX:
# vgcreate -s 64 /dev/appsvg /dev/disk/disk10 /dev/disk/disk11 /dev/disk/disk12
Note:
- On AIX, in almost all cases you can immediately use disks in LVM commands, like the "mkvg" command to create a VG.
- However, on HPUX, your first step should be to "enable" a disk for LVM use, using the "pvcreate" command.
So, for example, before using the "vgcreate" command, we actually should have used "pvcreate" on all member disks, to have enabled them for LVM usage.
Note how remarkably similar the "mkvg" and "vgcreate" commands are. After the moment you entered such a command, some important things happens:
- The three disks get metadata written in some special areas at the beginning of such a disk.
HPUX disks gets (among other special area's) the "VGRA" area, and AIX disks gets at least the "VGDA" area.
We will see them in detail later on. Important for now, is that by those area's, the disks gets identied as members of the appsvg Volume Group.
That is, metadata is written inside those special area's, which clearly state to which VG they belong.
- The three disks gets logically divided in socalled "Physical Partitions" (PPs), each exactly 64 MB in size, and numbered sequentially.
The phrase PP is in use in AIX. An equivalent exists in HPUX, and there a PP is called a "PE" (Physical Extend).
So, in order to shorten the text, lets talk about PP's and we silently know that when we explicitly talk about HPUX, the correct
term actually is "PE". But they mean exactly the same thing
So, suppose we have 3 disks of 40 GB each, then for example hdisk3 gets the PPs 1-639, hdisk4 gets PPs 640-1279, and hdisk 5 gets the PPs 1280-1919.
This sort of administration gets written in the VGRA/VGDA as well. Note that ofcourse, nothing changes in the physical sectors of those disks.
For example, if they use 512 bytes or 4098 bytes as a sectorsize, that remains. However, logically, the disks get divided into
a sea of contiguous PP's
- A "registry" get's updated in the Operating System, which says that a new VG exists, using 3 member disks.
In AIX, this registry is most notably the "ODM" database, while in HPUX, the file "/etc/lvmtab" represents the most important registry.
Note that in both AIX and HPUX, the "-s" switch determines the Physical Partition size. Here we choose for a PP size of 64 MB each.
However, in many cases you might have all sorts of reasons to choose a smaller or larger PP size, like for example 16 MB, or 256 MB etc..
Now take a look at figure 1, which illustrates what has happened.
Fig 1.
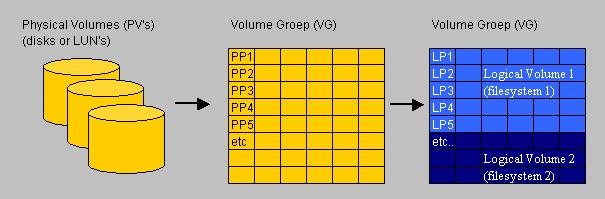
In figure 1, you see three "parts" so to speak.
We started out with three independent disks (part 1). After doing the "mkvg" or "vgcreate" command, we have arrived at part 2.
In a certain logical way, we "melted" the three disks into one "contiguous sea of PP's" (part 2).
Ofcourse physically the three disks still exists ;-)..., and if you would power down the machine, you will see "nothing" differently.
But once the OS get started, and the LVM gets "alive", then the Registry is consulted, and the special area's of the disks are read,
and the Volume Group "appsvg" gets "activated", or, in LVM talk, "varied on".
Now, having all those PP's is fine, but "something" additional has to be done to make it all functional. Indeed, we should create one or more
socalled "Logical Volume(s)" (LV's).
You should see it this way, that a "Logical Volume" actually is fully equivalent to a "Filesystem".
This is the way how it works with a Logical Volume Manager.
So, using the example above, where we used the "mkvg" command on AIX, and the "vgcreate" command on HPUX, we are ready to create one or more
Logical Volumes in the "appvg" Volume Group.
Since we have about 1920 PP's in our new Volume Group, using the appropriate command, we can "say" how many PP's should be
assigned to a particular LV.
So, say for example that the new LV has an initial size of 1400 PP's, then it is clear this LV spans more disks than just one.
Since, under the choosen PP size of 64 MB in our example, a disk has about 640 PP's. In total in the VG, we have about 1920 PP's.
So, if you would create, say "LV01" with a size of 1400 PP's, and "LV02" with a size of 500 PP's, then you would have a situation
which resembles "part 3" in Figure 1. Here, in that example, we have a large Logical Volume, and a smaller Logical Volume.
So, as an example, let's try to create a LV on AIX and HPUX. Remember, these are just examples.
=> Creating a Logical Volume:
- On AIX:
# mklv -y lvol10 -c 1 appsvg 1400
- On HPUX:
# lvcreate -L 10240 -n lvol10 /dev/appsvg
Again, the commands to create a LV on AIX, and HPUX, have some similarity, although less compared to the "mkvg" and "vgcreate" commands.
Here I used some rather bizarre options, but it is on purpose.
First, in AIX, it's pretty much customary, to mention the number of PP's in the command. Here I choose 1400 (of 1920 available PP's), so lv10 will "span"
more than one disk, for sure. Actually, since each disk counts about 640 PP's, then we may conclude that 2 disks are fully used, while the third
disk is partly used.
With the "-c 1" option, I told the command to have only one copy of each PP, which means I am not mirroring "lvol10".
So, for example, if you would have used "-c 2", then you would have requested 2 copies per PP, meaning 2800 PP's in total.
But that's mirrored. For the actual usable size of "lvol10", it's still 1400 PP's. Do you notice I don't even have 2800 PP's?
So, an unmirrored LV of 1400 PP's (that's 1400 x 64 MB = 89600 MB) is created.
Note that we do not have any form of redundancy here. If one disk crashed, on which "lvol10" resides, it's "game over".
So, actually, in many cases, the switch "-c 2" will be used.
However, there still might be situations that you need a large LV, spanning multiple disks, with no LVM redundancy implemented.
Ofcourse, it is not recommended for production machines.
Secondly, in HPUX, it's pretty much customary, to mention the size of the LV in the command, by directly using the "-L" switch.
The switch used to implement mirroring is "-m", so say you want an additional copy of each PP, use the "-m" switch.
In HPUX, you then would say "-m 1", for requesting one additional (mirrorred) copy. Notice the difference in AIX ("-c 2") an HPUX ("-m 1").
So, having mirrorred PE's in HPUX, we could change the command into for example:
# lvcreate -L 400 -m 1 -n lvol10 /dev/appsvg
Note: this time I choose 400MB, because 10240MB is too large (in our example) to implement mirroring.
Using an Logical Volume "name" (like "lvol10") on the commandline, is actually optional. If you leave it out, the system itself will generate one.
Ok, these were just two commandline examples. Some options are pretty "self explanatory": for example, it's pretty obvious you need to mention
the right "Volume Group" on the commandline, which should contain the new LV.
So, are we done now? No, we have a "Logical Volume" alright, but it still is not formatted to hold a certain "Filesystem type".
On HPUX, AIX, and Linux, multiple filesystem types are available.
Since so many types of "filesystems" are availble, we cannot expect the lvcreate command, to just choose one. That's why we need
to format the new LV with a filesystem of our choiche (like JFS2 in AIX, or VxFS in HPUX, and many others.)
Here are two examples (one for AIX, and one for HPUX), to get a proper filesystem on our newly created Logical Volume "lvol10".
=> Creating a Filesystem:
- On AIX:
# crfs -v jfs -d lvol10 -m /data -a bf=true
- On HPUX:
# newfs -F vxfs /dev/appsvg/rlvol10
Ok, it was quite a long way from creating a Volume Group, to finally creating a filesystem on a Logical Volume.
However, it can be done somewhat "faster". However, here I choose for the "long path", for illustrational purposes.
Let's recap:
In order to create a new filesystem, on a new LV, in a new VG, you can follow this path:
- Create the VG (using "mkvg" on AIX, or "vgcreate" on HPUX)
- Create the LV (using "mklv" on AIX, or "lvcreate" on HPUX)
- Create an appropriate filesystem on the LV. Here, usually many commands exists to achieve that, like "mkfs", "newfs", and other commands.
Now, the above "recap" assumed that the disks (PV's) are "ready" for LVM management. Sometimes that is not true at all.
In such a case, we need to initialize the disk(s) for making them "LVM ready".
Then, actually 4 steps are needed, and the first step would be, for example, to use "pvcreate" for HPUX.
For now, assume that in AIX, disks (or "Physical Volumes") are most often "ready", while on HPUX, "pvcreate" sometimes needs to be used first.
For HPUX, if you would "carve out" diskspace on a SAN, and expose it to the HPUX machine, often the pvcreate is not needed.
For "real" disks, contrary, the pvcreate is most often needed.
These sort of details will be discussed in Chapter 3.
Be very carefull using the "pvcreate" (HPUX) or "chdev" (AIX) commands on a physical disk. For example, "pvcreate" will initialize the disk,
and former data is lost.
Sometimes in Unix, many ways exist to reach a the same goal. For example, it's true that often many commands exist for "just"
creating a filesystem. Since so many commands exists, some of them using totally different switches, it really can be somewhat confusing.
In reality, many commands are just "wrappers" over a more fundamental commands. What can I say...: it's Unix....!
It's probably best to "memorize" the different shortnames in use with LVM:
PV: Physical Volume (or disk, which can be a "real" physical disk, or a LUN from a SAN).
VG: Volume Group (one or more PV's logically united in a "pool" of "disks").
LV: Logical Volume (located in a VG; the basis for a filesystem).
Note:
This document is "commandline" oriented. However, on both AIX and HPUX, a webinterface is available with might ease
these type of administrative tasks.
More importantly, on both systems, a "(ascii) graphical Menu system" is available which can be used for most administrative tasks,
like creating user accounts, change network parameters and much more..., but indeed also for most LVM tasks.
But not withstanding the fact that those tools are great indeed, still, the most power sits on the commandline.
Besides, to illustrate a certain concept, it's hard "to beat" a commandline example.
Anyway, the two "(ascii) graphical Menu systems" are:
HPUX.: sam
AIX..: smitty
So, if you want to use them, just enter "sam" or "smitty" from the commandline.
Although what we have seen above (which is pretty important), LVM management might involve adding a disk to a VG,
or increasing the size of a Logical Volume (LV), or just the other way around (removing a disk from a VG etc.. etc..)
Indeed ! Plenty of tasks here.
- As just an example, to add a disk to an existing VG in AIX, you could use a command similar to:
# extendvg appsvg hdisk6
- For the same task on HPUX, you would use a command similar to:
# vgextend /dev/appsvg /dev/disk/disk13
In the examples above, we used the name "vgapps" for a new Volume group. A remark on the "naming" of Volume Groups
is appropriate here:
The Volume Group that contains the Operating System (with "/", "/var", "/usr" and all others) is:
- AIX:
"rootvg" is the default VG containing the OS. So, after an install of AIX, it is automatically installed.
- HPUX:
Most often it is named "vg00", so, after a (default) install of HPUX, it is automatically installed as vg00.
For user defined Volume Groups, although you are pretty much "free" in naming convention, you should use a "selfdescribing"
name like for example "oravg" (for Oracle databases), or "wasvg" (for a WebSphere application) etc.. etc..
Per default, HPUX uses an "auto naming" convention. That is, we started with "vg00", and any VG created after that are "per default"
named as "vg01", "vg02" etc.., unless you explicitly use a VG name in "sam" or on the commandline.
Mirroring PP's in AIX, or PE's in HPUX:
We know that a VG consists of a "sea" of Physical Partitions or PP's (in HPUX: PE's). However, when dealing with LV's,
we often speak of "Logical Partitions" or LP's too. In HPUX, they are called "Logical Extends" or "LE's".
- When a Logical Volume is not mirrored (or striped) in a VG, then each LP maps exactly to a PP.
- However, when you create a Mirrored LV, then you "say to the LVM" that you want a certain amount of PP's, but that
for each PP, actually 2 (or more) copies must exists on different disks.
To make it easier to talk about partitions, we then say that a LV consist of say 1000 "Logical Partitions" (LP's), but in fact
2000 Physical Partitions (PP's) are involved: For each LP, there exists 2 identical PP's.
So, the LV uses an abstract Partition, called "Logical Partition" (LP), which is actually equivalent
to a Physical Partition and its optionally redundant copies (of that Physical Partition).
The LVM then makes sure that the "administration" or "accounting" of Partitions is kept in order.
=> Example: A mirrored LV on AIX:
# mkvg -y datavg -s 64 hdisk2 hdisk3
Here we create the VG "datavg". In this case, we used 2 disks, so later we are able to create a Logical Volume,
where each LP has 2 equivalent PP's, where one PP reside on hdisk2 and a copy of that PP reside on hdisk3.
As we know, the command (on AIX) to create a LV is like:
mklv -y [Logical_Volume_Name] -c [No_of_Copies_of_PPs] [Volume_Group_Name] [No_of_LPs]
So, here is a typical command to create a Logical Volume. Here the LV is named "lv05":
# mklv -y lv05 -c 2 datavg 100
Switch "c" determines the total number of copies. So, with "-c 2" there exists 2 PP's per LP.
Now, what about the size of our new LV in the above example? The lv05 Logical Volume, has a size of 100 x 64MB = 6400 MB.
But it's mirrored, so, there are 100 PP's on hdisk2 and 100 PP's on hdisk3.
So, we have spend 200 PP's in total, thus 12800 MB is in use,
However, in effect you only have 100 LP's to store data on. The Logical Volume is mirrored.
=> Example: A mirrored LV on HPUX:
# lvcreate -n lvol2 -L 10240 -m 1 -s /dev/vg03
The default value for "m" is 0 (no mirror copies). So, with "-m 1" there exists 2 PE's per LE.
Ok, let's try to study LVM somewhat further...
3."LVM" in some more detail:
3.1 Displaying "Volume Group" information:
3.1.1 VG info on AIX:
On AIX, usefull commands for retrieving "Volume Group" information, are for example:
# lsvg
# lsvg datavg
# lsvg -l datavg
# lsvg -p datavg
The "lsvg" command "as is", just produces a list of VG's which are on your system, like:
# lsvg
rootvg
appsvg
datavg
The "lsvg [VG_Name]" command shows many specifics of the VG, like the number of PP's, free PP's, the VG ID, the number of LV's, and much more:
# lsvg oravg
VOLUME GROUP:...oravg.............VG IDENTIFIER:..00ccf45d00004c0000000104564d2386
VG STATE:.......active............PP SIZE:........256 megabyte(s)
VG PERMISSION:..read/write........TOTAL PPs:......1894 (484864 megabytes)
MAX LVs:........256...............FREE PPs:........492 (125952 megabytes)
LVs:............4.................USED PPs:.......1402 (358912 megabytes)
OPEN LVs:.......4.................QUORUM:.........2
TOTAL PVs:......2.................VG DESCRIPTORS:.3
STALE PVs:......0.................STALE PPs:......0
ACTIVE PVs:.....2.................AUTO ON:.......yes
MAX PPs per PV:.1016..............MAX PVs:........32
LTG size:.......128 kilobyte(s)...AUTO SYNC:......no
HOT SPARE:......no................BB POLICY:......relocatable
Using switches, like "-l" or "-p" will show you detailed information on a specific subject. For example, the "lsvg -l [VG_Name]" command
is oriented on showing the Logical Volumes which are in this VG, like for example:
# lsvg -l datavg
datavg:
LV NAME.......TYPE.....LPs......PPs....PVs....LV STATE.......MOUNT POINT
loglv01.......jfs2log..1........1......1......open/syncd.....N/A
lv02..........jfs2.....240......240....1......open/syncd...../data
lv03..........jfs2.....384......384....1......open/syncd...../dump
lv07..........jfs2.....256......256....1......open/syncd...../oradata
So, in this example, the VG "datavg" contains 3 filesystems (or 3 LV's): /data, /dump, and /oradata.
3.1.2 VG info on HPUX:
On HPUX, the most notable LVM command to get "Volume Group" information, is "vgdisplay".
Here are a few examples:
# vgdisplay
# vgdisply -v /dev/vg01
The first command produces a list of all your Volume Groups, with information like the number of PE's (the equivalent of AIX PP's),
the size of a PE, number of free PE's, number of LV's, and much more.
The second commands, using the verbose "-v" switch, zooms in at a VG of your choice like for example "/dev/vg01".
# vgdisply -v vg01
--- Volume groups ---
VG Name............ /dev/vg01
VG Write Access.... read/write
VG Status.......... available
Max LV............. 255
Cur LV..............3
Open LV.............3
Max PV............. 16
Cur PV..............2
Act PV..............2
Max PE per PV.......1016
VGDA................2
PE Size (Mbytes)....32
Total PE............700
Alloc PE............600
Free PE.............100
Total PVG...........0
Total Spare PVs.....0
Total Spare PVs in use 0
--- Logical volumes ---
etc.. (info on LV's)
3.2 Displaying Physical Volumes:
3.2.1 Header area's in a Itanium HPUX disk (as a Physical Volume).
In AIX, or HPUX, a Volume Group is completely selfdescribing.
This is so, since every Physical Volume (or disk), as a member of the Volume Group, has specific header areas at the beginning of the disk,
which lists the unique "Volume Group ID" and registers every other "Physical Volume" within this "Volume Group".
This simply means that those headers (on each disk), fully describe that Volume Group, the disk is member of.
It even goes that far, that you could "import" a VG on another Unix system, by just using the metadata from one disk (!) (using some import command).
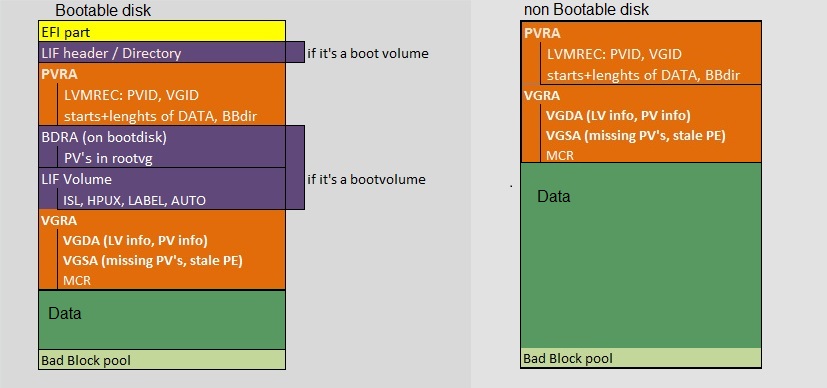
Fig 2. Headers in a HPUX disk (the EFI partition exists only on Itanium bootable disks)
So the "metadata" in the headers of each disk within the group, carries a complete description of the Volume Group,
and of each of it's disk members.
In figure 2, you see a relatively complex structure. If it's a disk on Itanium, we might start out with an "EFI" partition,
if it's a bootable disk. Disks on PA RISC go without an EFI partition.
Furthermore, the "offsets", or start addresses, of the various fields also vary a bit among LVM versions (like 1.0, 2.0, >2.0).
So, listing fixed addresses by which you can easily "xd" the various fields are not so very trivial.
But that is not important right now ("xd" is a certain HPUX command).
The PVRA and VGRA fields are present with any LVM disk. If the disk is made bootable, using "mkboot" or "lvlnboot" orso, we have
"LIF Directory", "BDRA", and the "LIF Volume" as well (those purple area's in figure 2).
The PVRA caries the "Physical Volume ID" (or "PV-ID"), and the "Volume Group ID" or ("VG-ID"), which uniquely identifies this disk
in a unique VG.
This is why you can (relatively easy) "export" a VG to another HPUX machine, and "import" the VG on that second machine.
The "BDRA" or "Boot Data Reserved Area" contains a list of all PV's of a VG which is used in the "boot" of a machine.
So, that VG would be "rootvg" on AIX, or "vg00" in HPUX.
If you didn't know this, usually, if you had the intention to create a bootable PV, you would use "pvcreate -B", before using "mkboot".
So indeed, a PV in "vg00", would then be used to boot HPUX from.
A PV (or disk) has at least one PVRA and VGRA header. Depending on the number of disks (PV's) in the VG, there could be one
or more copies on each PV (this relates to the socalled "quorum" of the VG).
3.2.2 Header area's on an AIX disk (as a Physical Volume).
A similar story holds for AIX "Physical Volumes" under LVM, although the actual header area's are different from HPUX.
- 1. VOLUME GROUP DESCRIPTOR AREA: VGDA
The VGDA, located at the beginning of each physical volume, contains information that describes all
the LV's, and all the PV's, that belong to the VG of which this PV is a member of.
Here too, the VGDA makes a VG selfdescribing. An AIX System can read the VGDA on a disk, and from that, can
determine what PV's and LV's are part of this VG. There are one or two copies of the VGDA per disk.
- 2. VOLUME GROUP STATUS AREA, VGSA:
This area on a PV tracks the state of mirrorred copies of PP's.
The VGSA contains state information about physical partitions and physical volumes.
The VGSA also "knows" if one PV in a VG is unavailable.
Each PV has at least one VGDA/VGSA. The number of VGDA's contained on a single disk varies according to the number
of disks in the VG. This is related to the socalled "quorum" of the VG.
- 3. LOGICAL VOLUME CONTROL BLOCK, LVCB
It contains LV attributes like (policies, number of copies).
Traditionally, the LVCB is "located" at the "start" of every LV. It contains information about the logical volume.
You can however, use the mklv command with the -T option, to request that the LVCB will not be stored in the beginning of the LV.
3.2.3 HPUX: get PV (or disk) info
3.2.4 AIX: get PV (or disk) info
3.3 Displaying Logical Volumes:
4. More on Bootdisks and the Bootprocess: